

Did you know slime was one of the top Halloween crafts for kids last year? It’s not just gooey fun—it’s also a sneaky science lesson in a bowl! 🧪 This year, I decided to take things up a notch with our own Spooky Halloween Slime. Whether you’re looking to keep the kiddos entertained, throw an epic party, or just want to get your hands sticky with creativity, this guide is your one-stop slimy shop.
We’ll go step-by-step, from base to add-ins, and I’ll even share a few tricks I’ve learned (including one hilarious slime fail). So grab your cauldrons—we’re diving into a Halloween craft that’s all treats and no tricks!
What You Need to Make Spooky Halloween Slime
So let me tell you, the first time I made Halloween slime with my niece, I thought we were just winging it with glue and food coloring. Big mistake. That stuff turned into a sticky nightmare and we ended up with more slime on the dog than in the bowl. 😅 Lesson learned: you need the right supplies—and trust me, the right ingredients make all the difference.
🧪 The Base: Safe and Simple Ingredients
Start with white school glue—just the regular kind you probably already have in your junk drawer. You’ll need an 8 oz bottle for one batch. Don’t overthink it; Elmer’s or any basic PVA glue works. I’ve tried off-brand glues, but they can get weird and watery.
Next up: baking soda. This acts like a thickener and balances the pH so your slime doesn’t stay sticky forever. One tablespoon is just right.
Now for the slime activator: contact saline solution. Get one that contains boric acid—it’s the secret behind stretchy, gooey success. Start with about 1½ tablespoons and add more as needed. Too much, though, and you’ll end up with rubbery blobs. Not cute.
If you want to skip the guessing game altogether, a DIY slime kit from Amazon might be your best bet. Most come with non-toxic slime activator, coloring, and even containers. Saves a ton of time and stress, especially if you’re making batches for a Halloween party.
🌈 The Color: Halloween-Inspired Hues
This is the fun part. Choose Halloween-themed food coloring—think swampy green, ghostly white, bright pumpkin orange, deep purple, or even jet black. I once mixed orange and a touch of red, and the slime looked like molten lava. My nephew was obsessed. 😈
Pro tip: Don’t use water-based markers or watercolor paint. They’ll mess up the texture. Stick with gel food coloring—it’s bold, concentrated, and won’t water down your slime.
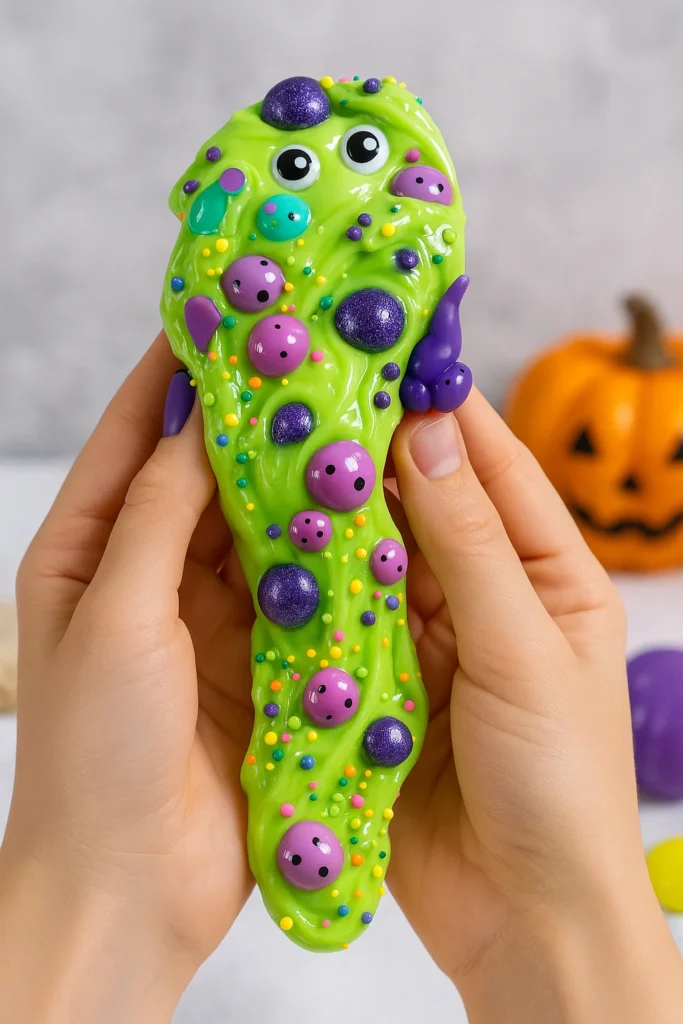
✨ Add-Ins for a Spooky Vibe
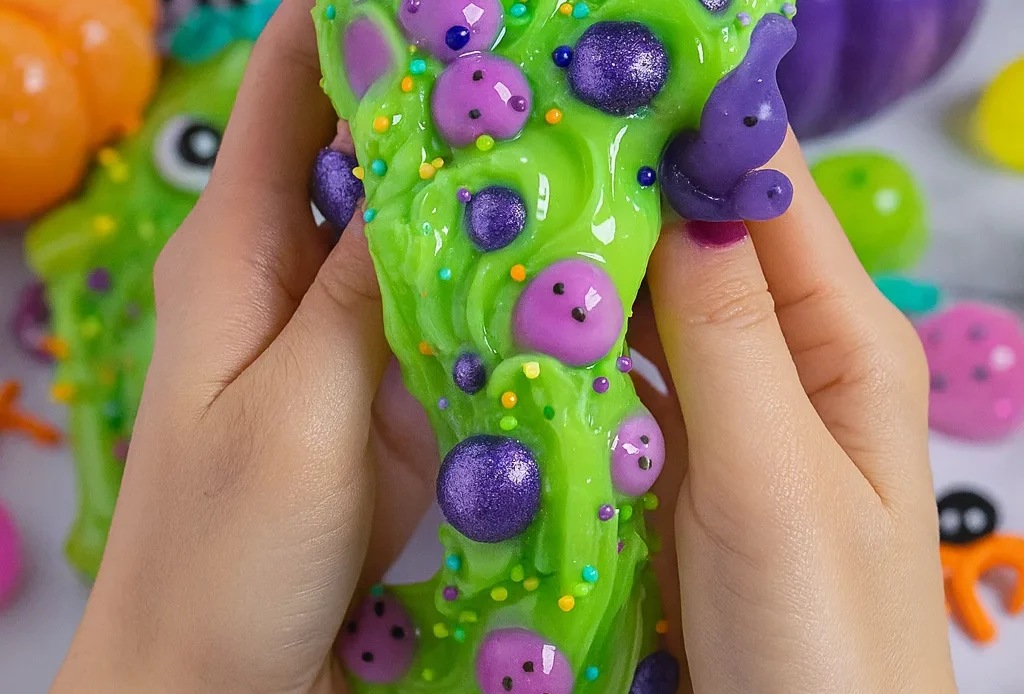
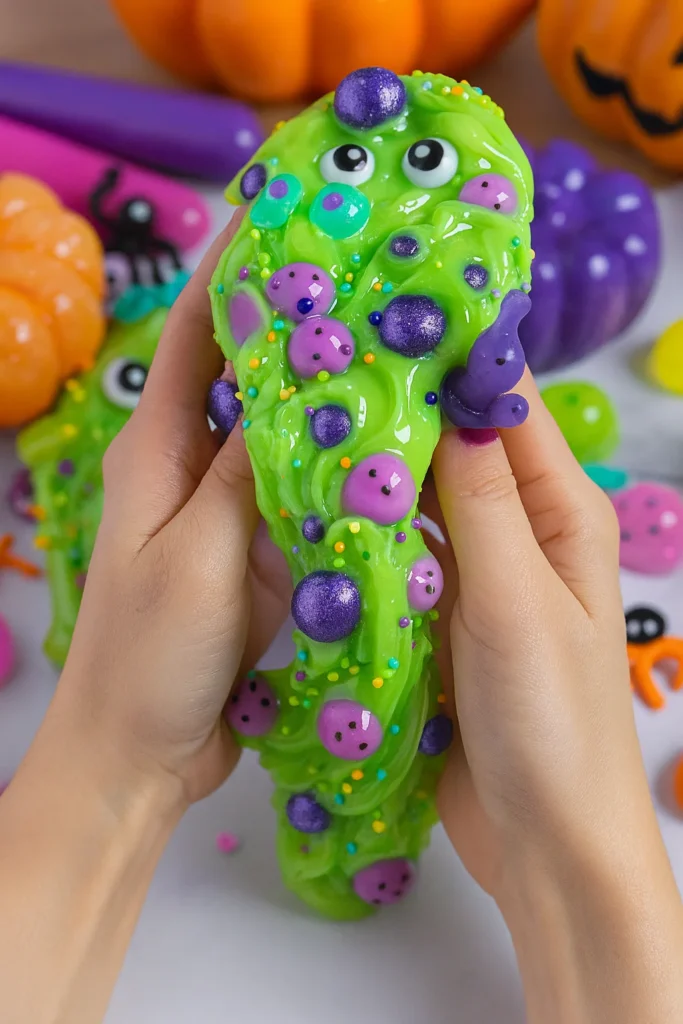
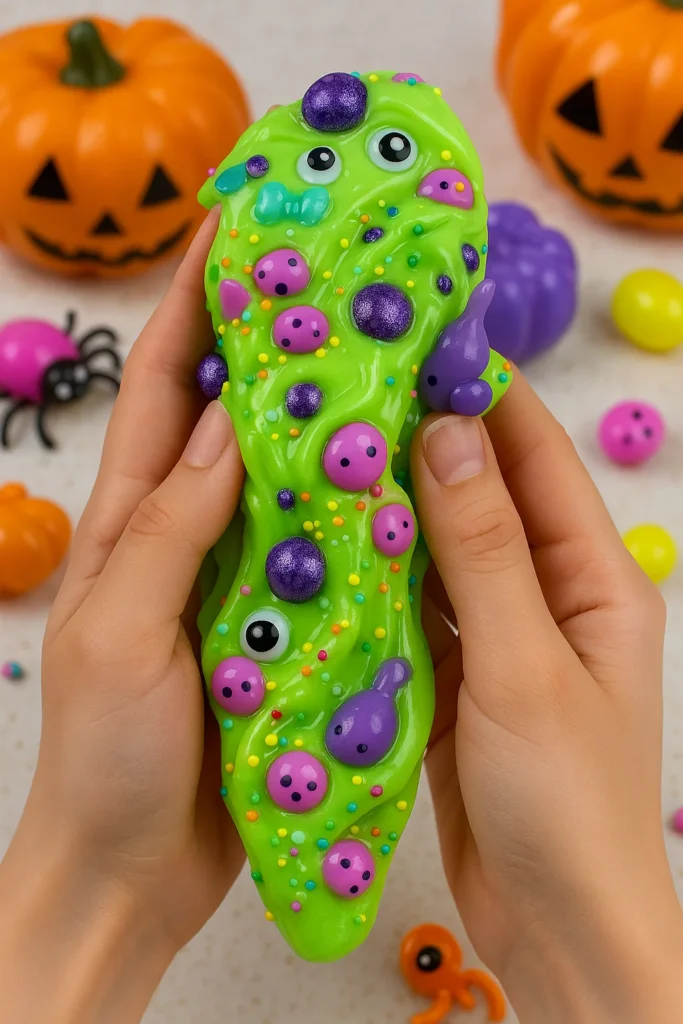
Here’s where the magic happens. Throw in some Halloween glitter (I go for purple and black) or tiny plastic spiders. You can even grab a bag of googly eyes or mini bones from the dollar store. These give your slime that ick factor that kids go nuts for.
Last year, I found glow-in-the-dark stars and added them to a black slime mix—BOOM, glow slime that looked like a witch’s potion! 🔮 Just make sure everything you add is child-safe and non-toxic if you’ve got little ones digging their fingers into it.
🧼 Bonus Tip: Setup Like a Pro
Lay down parchment paper or a cheap plastic tablecloth before you start. I learned this the hard way when bright green slime ended up stuck to my white countertop for three days. Slime stains aren’t fun. 😂
Also, have a few airtight containers or mini jars ready. Once the slime’s made, it keeps for a week or so—but only if it’s sealed tight. You can even label them with little Halloween tags if you’re feeling extra Pinterest-y.
Step-by-Step Instructions to Make Halloween Slime
Alright, let’s get into the messy magic, shall we? I’ve made this slime recipe with kids ages 4 to 12, and trust me—this one’s the real deal. It’s safe, simple, and just spooky enough to keep ‘em entertained longer than any tablet. If you’ve been Googling how to make slime at home, stop scrolling. I got you.
🥣 Step 1: Pour the Base
Start by squeezing an entire 8 oz bottle of white school glue into a mixing bowl. Use a medium-sized plastic bowl so you’ve got room to stir without flinging glue across the kitchen (guilty 🙋♀️). If you’re doubling the batch, don’t forget to double everything else too.
✍️ Helpful hint: Pour the glue slowly to avoid air bubbles. They make the slime look cloudy.
🎨 Step 2: Add Some Spooky Color
Drop in a few drops of Halloween food coloring—I usually do 3-4 drops and stir, then add more if needed. Want zombie green? Mix green with one drop of yellow. Blood red? Go heavy on the red and add a tiny speck of black.
I once accidentally used neon pink instead of red and ended up with something that looked like Barbie guts. The kids thought it was hilarious, but not exactly the Halloween vibe I was going for. 😂
🧂 Step 3: Stir in the Baking Soda
Add 1 tablespoon of baking soda and mix until smooth. This is your slime stabilizer—it helps control the stretch and makes sure things don’t stay too sticky. You’ll see the texture start to shift already.
This is also where I usually add glitter, if I’m using any. Doing it now distributes the sparkle more evenly than adding it at the end.
💧 Step 4: Activate the Slime
Time to bring this goo to life. Add 1½ tablespoons of contact saline solution slowly while stirring constantly. This is your slime activator for kids, so go slow. The glue will start to clump and pull away from the sides of the bowl. That’s how you know it’s working.
If it still feels sticky, add another ½ tablespoon and stir again. Don’t overdo it or your slime will get rubbery. I’ve gone too far before and ended up with what felt like a cold bouncy ball. Not the best texture for Halloween squishies.
✋ Step 5: Knead It!
Once it starts coming together, ditch the spoon and go in with your hands. Knead it like dough—stretch, fold, squish. It’ll be sticky at first but after a minute or two it turns super stretchy and satisfying.
Put on some Halloween music (I swear “Monster Mash” makes it more fun) and let the kids knead their own batches. It’s part of the sensory play experience and helps them feel like mad scientists!
👻 Optional Add-Ins for Maximum Creep Factor
Now for the finishing touch—add your tiny Halloween trinkets. I usually toss in:
- Plastic spiders
- Mini eyeballs
- Glow-in-the-dark confetti
- Foam pumpkins
Just press them in and knead a bit more to get that perfect spooky texture.
Fun Ways to Use Halloween Slime
Once you’ve got your slime looking spooky and feeling squishy, the real fun begins. I’ve used this stuff in classrooms, neighborhood parties, even handed it out on Halloween night—and let me tell you, slime never disappoints. If you’re looking for DIY Halloween crafts for kids that don’t end in sugar crashes, this one’s a win.
🎁 Slime as Halloween Party Favors
Last October, I hosted a small Halloween party for my son and his classmates. Instead of goody bags filled with candy, we gave out mini jars of homemade Halloween slime. I found these clear plastic containers shaped like cauldrons at the dollar store, popped in the slime, tied on a little tag that said “Witch’s Goo,” and boom—best party favors ever.
Kids were obsessed. And moms loved that it wasn’t more sugar. One even asked for the recipe right on the spot. So if you’re throwing a bash this year, trust me—skip the usual and go with these Halloween party favors.
🏫 Slime in the Classroom? Yes, Please!
Teachers, this one’s for you. I’ve helped out with class parties and holiday crafts for years, and nothing grabs attention like slime time. You can turn it into a classroom Halloween activity with a bit of science talk—”What happens when you mix polymers and activators?” Sounds fancy, right? But it’s just slime.
You can also set up slime stations: one for mixing, one for kneading, and one for decorating. It keeps things organized and less chaotic—well, a little less chaotic. 😅
Just be sure to label everything and let parents know ahead of time, especially if you’re adding glitter or trinkets that could be a choking hazard for younger kiddos.
🍬 Trick-or-Treat Giveaways That Stand Out
Want to be the cool house on the block? Try giving out mini containers of non-candy Halloween slime. I started doing this a couple years ago after my nephew’s dentist gave me the idea. Kids are always shocked—“Wait, this is slime??” Yes, little goblins, and it’s homemade.
I recommend using small condiment cups with lids (like the kind you get with ranch dressing), sealing them with washi tape or stickers, and tossing them into Halloween baskets. You’d be surprised how many parents thank you later.
And hey, if you still want to hand out candy, just do both. Win-win!
🖐️ Sensory Play All October Long
You don’t need a party to enjoy slime. Keep a batch or two in a jar and let the kids play during screen-free time. It’s a solid sensory play idea for toddlers and older kids alike. Just be sure to keep it away from carpets. Ask me how I know. 😬
Sometimes I add cinnamon or pumpkin pie spice (just a tiny sprinkle) for a scented version. It’s subtle but adds that extra fall vibe.
Troubleshooting Common Slime Mistakes
Okay, so let’s be real for a sec. Not every slime-making session goes off without a hitch. I’ve had batches that were way too sticky, ones that wouldn’t stretch, and a few that ended up looking like something that crawled out of a haunted garbage can. 😅 If you’ve had your share of DIY slime fails, don’t worry—you’re not alone. Here’s how to fix the most common slime catastrophes.
😖 Slime Too Sticky? Here’s the Fix
This is hands-down the most common issue. If your slime is sticking to everything—hands, counters, hair (yup, been there)—you probably didn’t add enough activator. Don’t panic.
Here’s what works:
- Add a few drops of contact saline solution, then knead again.
- Repeat in small doses. I’m talking drops, not spoonfuls.
- If that still doesn’t work, try mixing in a tiny pinch of baking soda.
One time, I panicked and dumped in a ton of solution at once. Ended up with a rock. So yeah… slow and steady wins the slime race.
🧊 Slime Too Stiff or Rubbery?
On the flip side, if your slime stretches like a cold mozzarella stick and snaps in half? You’ve over-activated. It’s usually from too much saline solution or baking soda. I’ve done this when I’m multitasking and not really measuring. Whoops.
Try this to save it:
- Add a small squirt of white glue.
- Knead it back in slowly—don’t expect instant results.
- You can also work in a drop or two of warm water or hand lotion for softness.
I’ve even microwaved the slime for 5–7 seconds (in a safe container) to loosen it up. Not perfect science, but hey—it worked!
🧴 Slime Not Forming At All?
If you’re stirring and stirring and nothing’s happening, check these:
- Is your contact lens solution boric acid-based? If not, it won’t activate.
- Did you mix in baking soda before the saline? That step matters.
- Was your glue expired or watery?
I once grabbed a “glitter glue” thinking it would be genius. Spoiler: it never set. Just sloshy, sparkly soup. So yeah—stick with plain white PVA glue.
🧹 Sticky Cleanup Tips
Slime on clothes? Vinegar. Seriously, just soak the fabric and gently rub. For carpet? Use warm water and a spoon to lift it out. Learned that trick after a glow-in-the-dark slime exploded on my rug. Still not sure how it happened.
Also, keep baby wipes nearby during playtime. They save lives. (Okay, maybe just furniture.)
And there you have it—your ultimate guide to whipping up Spooky Halloween Slime like a pro! Whether you’re planning the coolest Halloween party favors, need a fun classroom craft, or just want to avoid the sugar crash from one more candy bag, slime hits all the right notes.
It’s hands-on, sensory-rich, and loaded with creative potential. Plus, once you get the hang of this DIY slime tutorial, it becomes one of those go-to Halloween crafts for kids year after year. I’ve even started a little tradition where we make a new color theme every October—last year was “witch guts,” this year we’re doing “toxic ooze.” 🧪
So go ahead, give it a try. Experiment. Let the kids mix in too many eyeballs or way too much glitter—because that’s half the fun. And hey, if something goes wrong? You’ve got this guide to back you up.
If this slime recipe gave your Halloween a spooky upgrade, don’t forget to share it on Pinterest! Save it for later or pin it to your Halloween board so more folks can get their goo on. 🎃👻
Happy sliming, friends!
