

Did you know the average American family tosses out over 200 plastic jugs every year? 🎃 Why not turn some of that trash into treasure with one of the most fun and eco-friendly Halloween crafts around — Milk Jug Ghosts! These glowing spirits are not only adorable and spooky, but they’re also ridiculously easy to make. And let me tell you, kids love them. It’s like turning recyclables into magic! Whether you’re decking out your front porch or spicing up your indoor decor, this DIY hits all the right notes: budget-friendly, fun, and festive.
Supplies You’ll Need to Create Milk Jug Ghosts
Okay, so I’ve gotta be honest — the first time I tried making these Milk Jug Ghosts, I thought I could just wing it with whatever I had lying around. Spoiler alert: it didn’t end well. One of the ghosts melted (don’t use real candles, y’all), another wouldn’t stand up straight, and the third had a face only a mother could love. 😅
After a few years of trial and error, I’ve got my ghost-making kit down. Here’s everything you’ll want to gather before you dive into one of the easiest, cutest Halloween decorations you can DIY.
🛒 The Must-Have Supply List
Empty plastic milk jugs: You’ll want 3 to 5 of these, washed out with labels peeled off. The clearer the better — light travels beautifully through them!
Black permanent marker: Trust me, the bold ones work best for drawing faces. Sharpie is my go-to. Thick lines really pop at night.
LED tea lights or white string lights: I used to try glow sticks, but they don’t last long. LED lights are brighter, reusable, and safer for little hands. Bonus — if you’re doing this as a DIY craft for kids, you’ll love how mess-free this part is.
Scissors or craft knife: You’ll need this to cut a hole in the back or bottom of each jug. Just wide enough to fit your lights through. (Pro tip: I use an X-Acto knife with a safety cap so I don’t jab myself mid-project.)
Optional but fun — white paint or tissue paper: I like to paint a thin coat of white on the inside of the jug for extra glow. Tissue paper works too if you wanna go for a ghostly, textured look.
This is seriously one of my favorite eco-friendly crafts — you’re reusing plastic jugs that would normally end up in the trash and you get to add some handmade charm to your Halloween decorations. Win-win.
One thing I learned the hard way? Don’t skip drying the jugs. I once sealed in moisture and, well… moldy ghost isn’t the Halloween vibe we’re going for.
Want to get extra fancy? I’ve added mini witch hats and even little scarves to mine. Kids love giving their ghosts names and personalities. I swear one of ours — “Gary the Grumpy Ghost” — comes out every year like clockwork.
Got your supplies ready? Good. Let’s get into the spooky stuff next.
How to Design the Perfect Ghost Face
Alright, let me tell you — this is the part where your Milk Jug Ghosts really come to life. Or… un-life? 👻 Either way, the ghost face is where the magic happens. And if you’re doing this with kids, it’s hands-down their favorite step.
I learned pretty quickly that letting kids go wild with the marker is way more fun than trying to control the “artistic direction.” One year, my 6-year-old drew a ghost with glasses and a mustache. We named him “Professor Boo.” Still a fan favorite.
👻 Ghost Face Ideas (From Cute to Creepy)
Silly and fun faces: Think wide eyes, crooked smiles, big cartoonish tongues. These are perfect for toddlers or anyone doing Halloween crafts for kids. I recommend printing out a few face templates as inspiration, especially if your crew isn’t quite ready to freehand yet.
Spooky and scary: Angry eyebrows? Hollow eyes? Sharp teeth? Go full haunted house mode. Just don’t scare the little ones too much — we’re going for glow-in-the-dark cute, not nightmares.
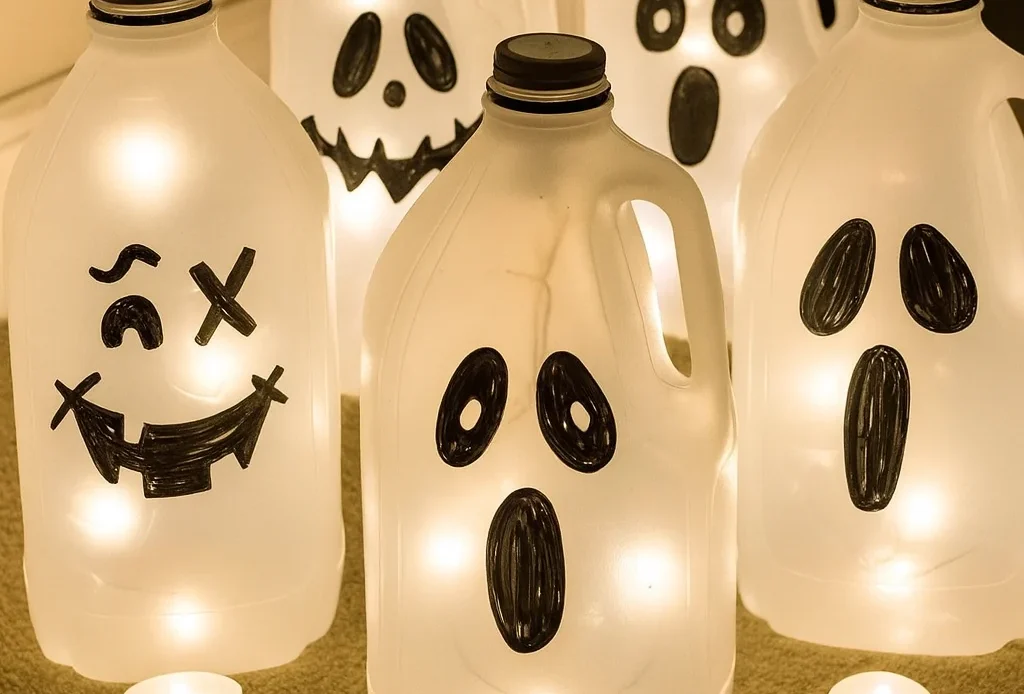
Classic ghost look: Think “Boo!” style — round eyes and an “O” mouth like they just saw a spider. This is what I usually default to for porch decorations. It’s simple, clean, and glows beautifully at night.
🖍 Tips for Drawing Faces on Plastic
- Use a black permanent marker. I tried washable markers once — never again. Smudged all over the place. Not ideal when you’re going for crisp ghostly expressions.
- Let the marker dry before touching or moving the jugs. I learned that the hard way when I smeared a perfect ghost face with my thumb.
- If you’re into DIY Halloween decorations, a fine-tip marker is great for details, while a thick chisel tip gives bold outlines.
- Want extra glow? Outline the features in glow-in-the-dark paint. It’s a small thing but looks amazing when the lights go out.
You honestly can’t mess this up. I’ve drawn ghosts with cross-eyes, fangs, even one wearing lipstick — they all turned out fun in their own weird way. That’s the beauty of homemade Halloween decorations. It’s about the charm, not perfection.
So go grab that marker, channel your inner ghostbuster, and start drawing! Up next — let’s get those ghosts glowing for real.
Lighting Options for Glowing Ghosts
Let’s be real — without the glow, they’re just milk jugs with faces. It’s the lights that make these ghosts come alive…or, uh, undead. I remember the first year I tried this, I used a flashlight jammed inside one. Not only did it fall over every time the wind blew, but it also drained the batteries in, like, 20 minutes. Never again.
Now? I’ve tested every type of light you can imagine, and I’ve got some solid go-to options.
💡 Best Lighting Options That Actually Work
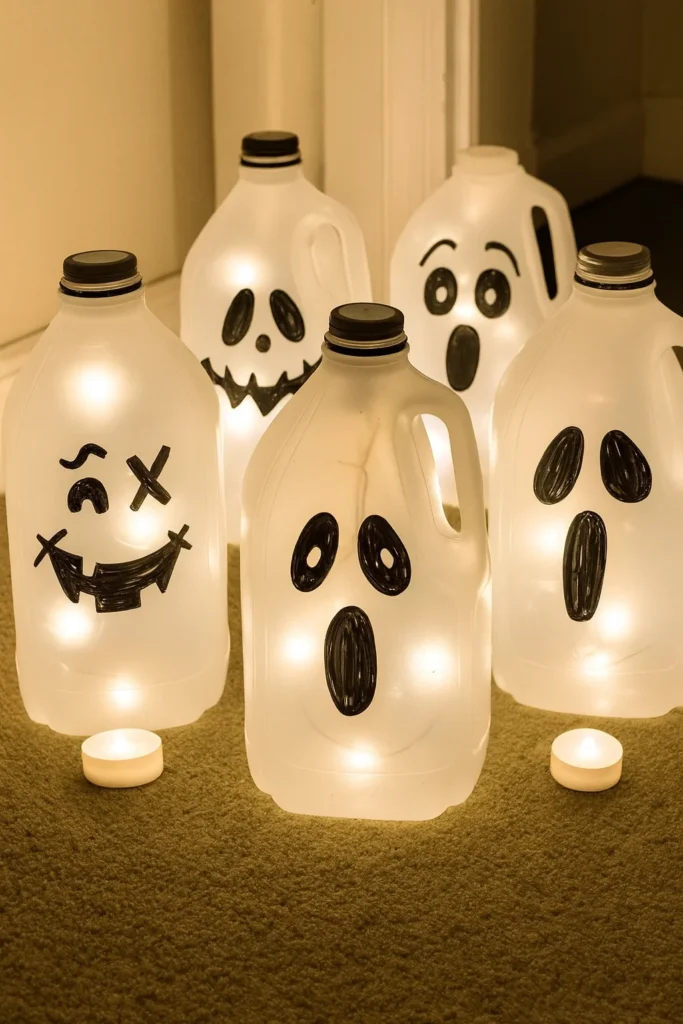
LED tea lights: These are my absolute fave for safe Halloween crafts. They’re small, cheap, and glow just enough to look eerie without being blinding. I buy the battery-operated ones in bulk every October. Stick one inside each jug and boom — ghost mode activated.
White string lights: These are perfect if you want to connect multiple ghosts together. One long strand of LED Halloween lights can light up 3–5 jugs at once. I usually string mine along the walkway for that spooky parade effect. Bonus — fewer batteries to deal with.
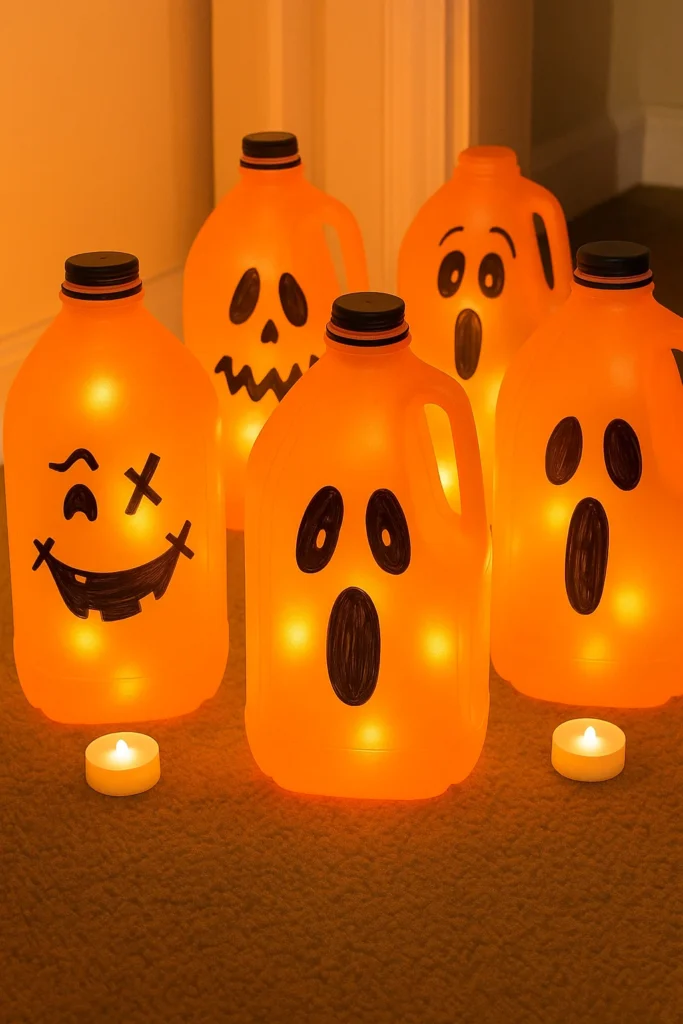
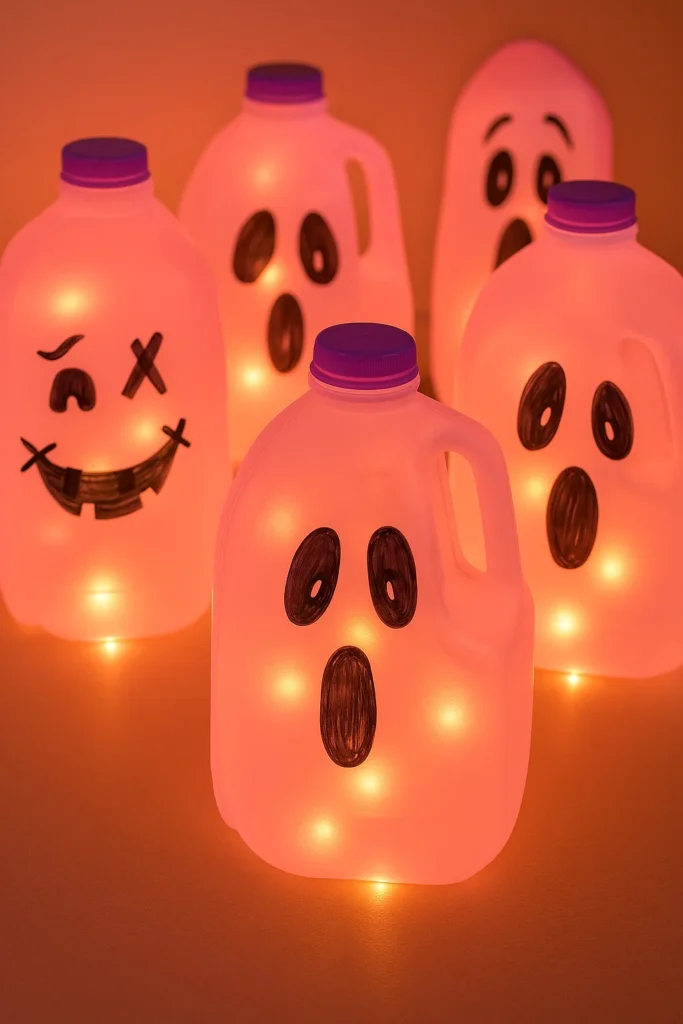
Color-changing fairy lights: If you’re feeling extra festive, try fairy lights that cycle through orange, purple, and green. It’s not super traditional ghostly, but it makes for an awesome trick-or-treat night vibe.
Glow sticks (meh): I’ve used these in a pinch, and they’re okay — just not great. They fade fast, especially if it’s cold outside. And they don’t give off that steady glow you want for porch displays. Still fun for a one-night thing, especially if you’re handing them out to kids.
🔋 Safety and Power Tips
- Always go with battery-operated lights unless you’re setting up near an outlet and can safely tape down wires.
- If you’re using plug-in string lights, make sure they’re rated for outdoor use. I made that mistake once — rained overnight, and I woke up to flickering ghosts. Not spooky in a good way.
- For extra glow power, paint the inside of your jugs with a thin layer of white paint before adding lights. It diffuses the light evenly and gives that perfect ghostly shine.
Lighting is where the wow factor really kicks in. I’ve had neighbors stop and ask where I bought my ghosts — they were shocked when I said it was just old milk jugs and a pack of LED lights. Whether you’re keeping it simple or going full Halloween yard display mode, the right lighting turns these DIYs into porch showstoppers.
Step-by-Step Instructions to Assemble Your Milk Jug Ghosts
Alright, you’ve got your milk jugs, you’ve drawn your ghost faces, and you’ve got your lights ready to roll. Now it’s time to bring those little ghouls to life — or at least light ‘em up and make ‘em spooky. This part is honestly my favorite. It’s simple, kinda messy, and super satisfying once they’re all glowing like little lanterns of Halloween joy.
I used to think this would take hours, but once you’ve got a system down, it’s a quick and fun Halloween DIY project — perfect for a weekend craft with the kids or even a solo decorating session while watching spooky movies.
🛠 Step 1: Clean and Prep the Jugs
Wash them out thoroughly. You do not want a ghost that smells like sour milk. I made that mistake once and it haunted my porch more than the ghost ever did.
Peel off the labels completely — sticky residue blocks the light and just looks messy.
Let them dry fully. A damp jug means foggy light and a higher chance of mold. Gross.
✏️ Step 2: Draw Your Ghost Faces
Grab your permanent marker and get creative. If the kids are involved, let them draw their own — the weirder the better. No perfection needed.
Want a little structure? Use a pencil first or print some face templates to trace.
Pro tip: Do the faces before cutting — it’s easier when the jug isn’t flopping around.
✂️ Step 3: Cut an Opening
Using scissors or a craft knife, cut a hole in the back or bottom of the jug. Just big enough to fit your LED light or to thread a string of lights through.
If your jugs will sit on the ground, a bottom cut works best. For hanging ghosts, make a cut near the back and poke holes to add string.
And always — always — watch your fingers. Crafting injuries are not part of the Halloween aesthetic.
💡 Step 4: Add the Glow
Drop in a battery-powered LED light or thread your fairy lights through the jugs. If you’re using string lights, space them out so each jug gets its own little glow spot.
I’ve even used a dimmer on mine once — it was a vibe. Looked like the ghosts were flickering in and out of existence.
🎃 Step 5: Display and Enjoy
Line them up on your porch steps, windowsills, driveway, or even hang them from a tree. Wherever they go, they’re gonna steal the show.
I usually make a little “ghost parade” along my walkway. It’s like having a row of glowing trick-or-treaters keeping watch. Plus, it’s a fun welcome for the real ones.
These jugs are honestly one of the most fun and budget-friendly Halloween decorations you can make. Cheap, charming, and totally doable with whatever’s already in your house. And once they’re lit up and glowing in the night? It’s like you’ve summoned a little ghost army made of plastic and imagination.
Next, let’s go beyond the basics and get into some creative variations to make your ghost gang totally one-of-a-kind.
Fun Variations & Display Ideas
Now that you’ve mastered the basics, let’s kick it up a notch. Because yeah, plain ol’ Milk Jug Ghosts are cute — but adding a little flair? That’s where the fun really starts. I didn’t even think about customizing them the first year I made some. But then my daughter slapped a tiny witch hat on hers and suddenly we had a whole Halloween squad with personalities. Total game changer.
🎩 Give Your Ghosts Some Style
Hats, bows, scarves — oh my! I’ve hot-glued everything from mini top hats to googly eyes on mine. One year I even made a pirate ghost. Kids loved it.
Add glow-in-the-dark accessories. I found glow paint at the dollar store and went to town. Painted ghost cheeks, glowing mouths, spooky outlines — it makes them pop, especially in the dark.
Use colored LED lights. Orange, purple, and green string lights give off a different vibe than the usual white glow. I used green last year, and it made the ghosts look like they were straight out of a slime lab.
🚪 Creative Display Setups
Line your walkway: Seriously, if you’ve got a path leading to your door, line it with your light-up ghosts. It’s one of the easiest outdoor Halloween decorations that gets a ton of compliments.
Hang them from trees or your porch: Just poke holes in the jug’s top, add some fishing line or twine, and hang them at different heights. Floating ghosts? Yes, please.
Create a ghost family scene: I grouped a bunch together with props — think pumpkins, fake spiders, hay bales — and it looked like they were having a little haunted picnic.
Add sound effects. Okay, I haven’t done this yet, but I saw a neighbor hide a little Bluetooth speaker behind their jug crew playing creepy sounds. Gonna steal that this year.
📸 Instagram & Pinterest Ready
These ghosts look amazing in photos. The glow, the faces, the accessories — it’s content gold. Snap a few pics before Halloween night, especially if you’re proud of your setup. They’ll totally stand out as customizable Halloween crafts that are both cheap and adorable.
The best part? You don’t need a design degree to pull this off. Just some imagination, a few extras, and maybe a hot glue gun that’s not covered in old glitter (mine always is). Whether your ghost is dapper, spooky, or straight-up ridiculous, it’ll shine — literally and figuratively.
Now let’s wrap this up with a few final thoughts and how you can share your spooky creations with the world.
And there you go — from empty milk jugs to glowing ghost legends on your front porch. I mean, who knew trash could look this good, right? What started as a little project to keep the kids busy turned into one of our favorite Halloween traditions. Every year we add a few more ghosts, each with its own little backstory (yes, we name them all), and it just makes October feel extra magical.
It’s hard to beat a DIY Halloween craft that’s this easy, this cheap, and this dang cute. Plus, you’re giving those plastic jugs a second life — a spooky, glowing second life. Whether you’re looking for eco-friendly Halloween ideas or just want to impress your neighbors without blowing a bunch of cash, these little guys check all the boxes.
The best part? There’s no right or wrong way to make them. You can go full Pinterest-perfect with coordinated colors and stencils, or just let the kids scribble ghost faces and toss in a tea light. Either way, it works.
So what are you waiting for? Grab your jugs, your markers, and your lights — and get crafting. And hey, if you do end up with a ghost army on your lawn or porch, please snap a photo and share it on Pinterest. I’d love to see your versions of this recycled Halloween classic.
Happy haunting, friends. 👻✨
