

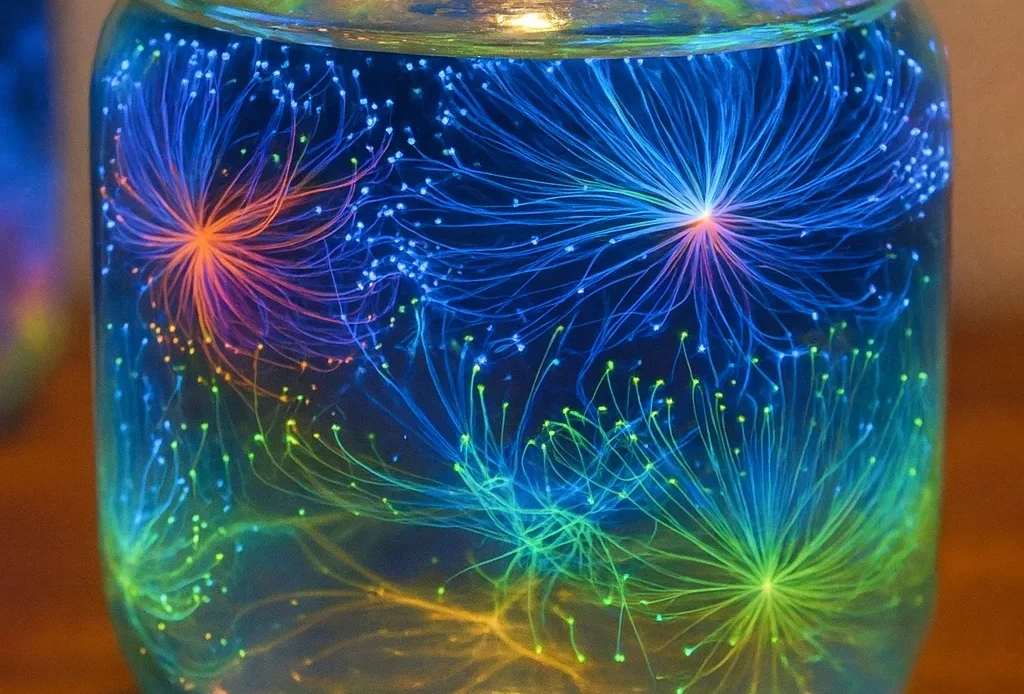
Ever seen fireworks light up the sky and thought, “What if I could do that… in a jar?” That’s exactly what this project is about! Welcome to one of the most dazzling science experiments you’ll ever try at home. With just a few household ingredients—warm water, cooking oil, glow-in-the-dark paint—you can create stunning, glowing bursts that look like tiny fireworks underwater.
This DIY activity is equal parts science and magic, making it perfect for curious kids, creative parents, or anyone who wants to add a pop of glow to their day. Plus, it’s totally safe and mess-free. Let’s dive into the sparkly world of homemade glowing fireworks in a jar!
Supplies You’ll Need for Glowing Fireworks Fun
Alright, before we dive into this glowing masterpiece, let me tell you—getting your supplies lined up makes all the difference. The first time I tried this glow-in-the-dark fireworks jar project, I scrambled around the house mid-experiment looking for a fork. Yeah, a fork. Rookie mistake. 😂 So here’s what I’ve learned from trial and error: prep everything ahead of time like it’s your own DIY science kit. Makes it feel legit, and way less chaotic if you’re doing this with little ones.
🔦 Must-Have: A Good UV Flashlight
Trust me on this—if you wanna see those glow-in-the-dark fireworks come to life, a solid UV flashlight is your golden ticket. I used a cheap one from a dollar store once, and the colors barely popped. But once I upgraded to a proper mini blacklight from Amazon? Game. Changer. The UV light excites the fluorescent pigments in the paint and food coloring—boom, instant glowing magic.
🎨 Non-Toxic Glow in the Dark Paint
Get the non-toxic kind. Seriously. You’re mixing this into a liquid where curious little hands and maybe even mouths are nearby. I’ve had the best results with neon or fluorescent craft paints labeled “safe for kids.” Bonus points if you grab multiple colors—they look insane when they burst in the water.
🫙 Mason Jar or Any Clear Jar
Classic mason jars work best. They’re sturdy, they look cute, and the wide mouth makes pouring stuff in less messy. I’ve also reused pasta sauce jars in a pinch. Just make sure it’s clear glass so you can see all the underwater action.
💧 Warm Water
Fill it up about three-quarters full. Not hot, not cold—warm. It helps the glow mix float and fall slower, giving that dreamy, drifting firework vibe.
🛢 Cooking Oil
Any basic kitchen oil works here. I use vegetable oil because it’s cheap and light. The oil creates a barrier for the glow paint to break through, giving that slow-motion firework explosion look. I tried coconut oil once… don’t. It clumps up when it cools. 😬
🍴 Fork + Small Bowl
Mixing the glow paint with oil is crucial. A fork helps create tiny glowing droplets, instead of one big gloopy mess. Whisk it lightly like you’re scrambling eggs.
✨ Optional Sparkle: Glitter or Glow Powder
Not gonna lie, adding glitter or glow powder turns this into a visual masterpiece. It’s like the difference between regular fireworks and a grand finale. But yeah… it will make cleanup a little annoying. Totally worth it, though.
If you’ve got younger kids, you might wanna lay everything out like a mini STEM activity station. Makes it feel like they’re junior scientists, which is honestly adorable and a sneaky way to teach them stuff about density and light.
Pro Tip:
Bundle these items together into a little DIY glow science kit and use it for birthday parties or rainy day boredom-busters. You’ll be that parent who makes science cool. 🧪💡
Step-by-Step Instructions to Create Your Glowing Fireworks
Okay, here comes the fun part—the actual creation of your glow-in-the-dark fireworks in a jar! The first time I did this with my niece, she gasped so loud when the glowing colors started exploding through the water, I thought I’d discovered a new planet. It’s that cool.
And don’t worry—this is one of those STEM projects for kids that’s super simple. You don’t need a PhD in science (or patience 😅). You just need to follow the steps below and be ready for a little interactive science fun.
🥣 Step 1: Warm Water Setup
Fill your clear glass jar about three-quarters full with warm water. Not boiling, not cold. Lukewarm. This helps the glowing droplets move slower and more dramatically through the jar, kind of like those old lava lamps.
✏️ Pro Tip: If you’re doing this with younger kids, put a tray or plate under the jar. Saves you from crying over spilled glow water.
🛢 Step 2: Mix Oil and Glow Paint
In a separate small bowl, pour 2 to 3 tablespoons of cooking oil. Then, add a few drops of your non-toxic glow in the dark paint or fluorescent food coloring. Use a fork to mix it all up. You’re aiming to break up the paint into tiny, suspended blobs—this part is what makes the “fireworks” actually burst.
It’ll look a little weird, kind of like neon dots floating in oil. That’s exactly what you want.
🧪 Step 3: Pour and Watch the Magic
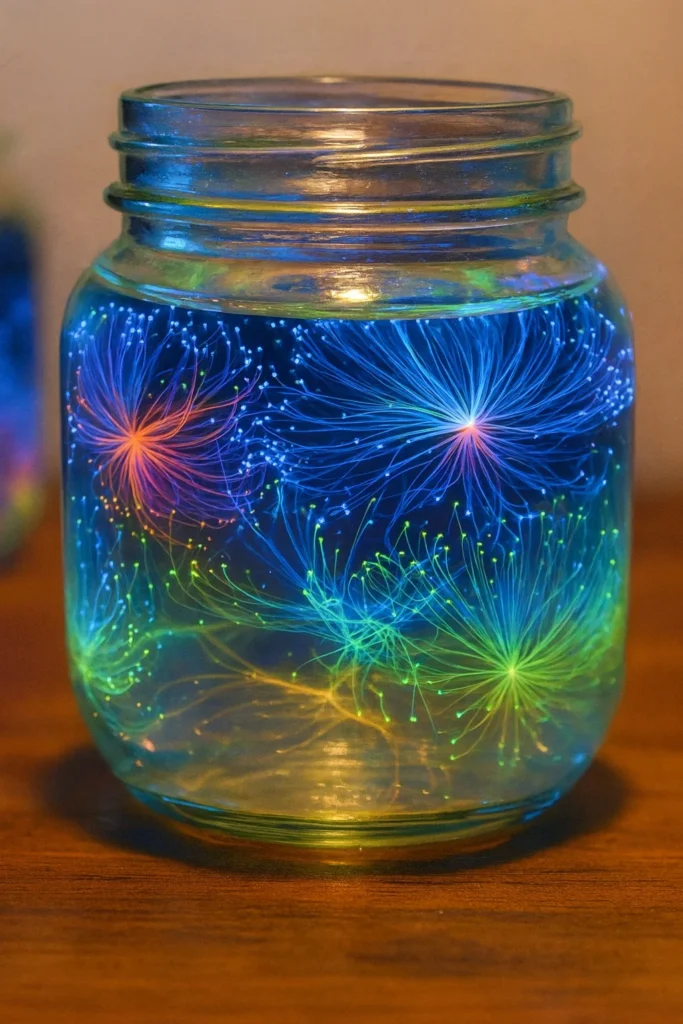
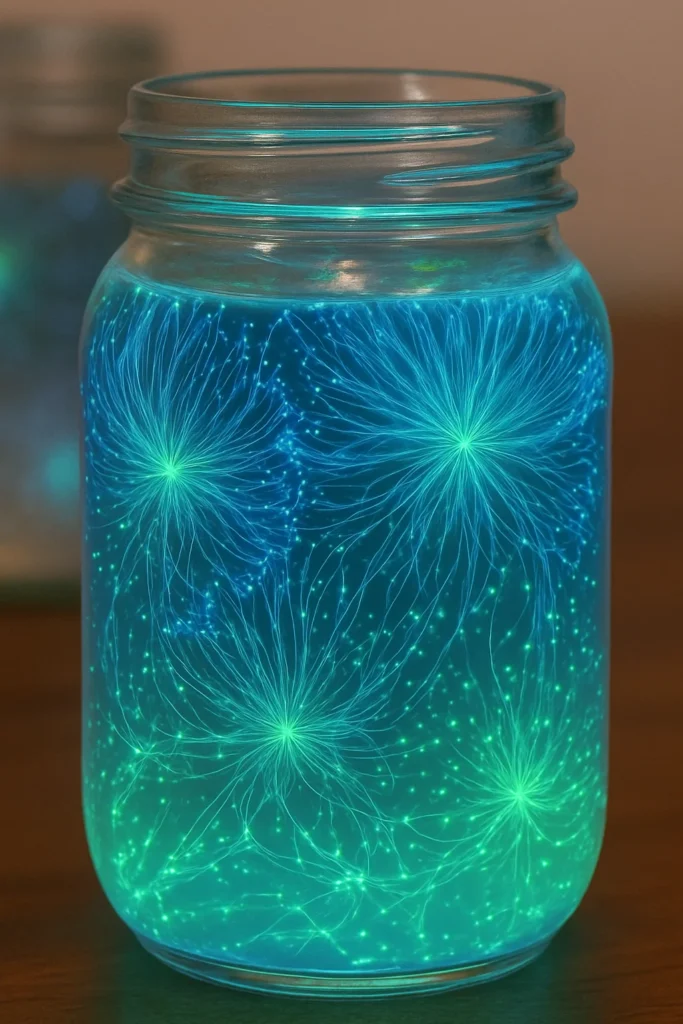
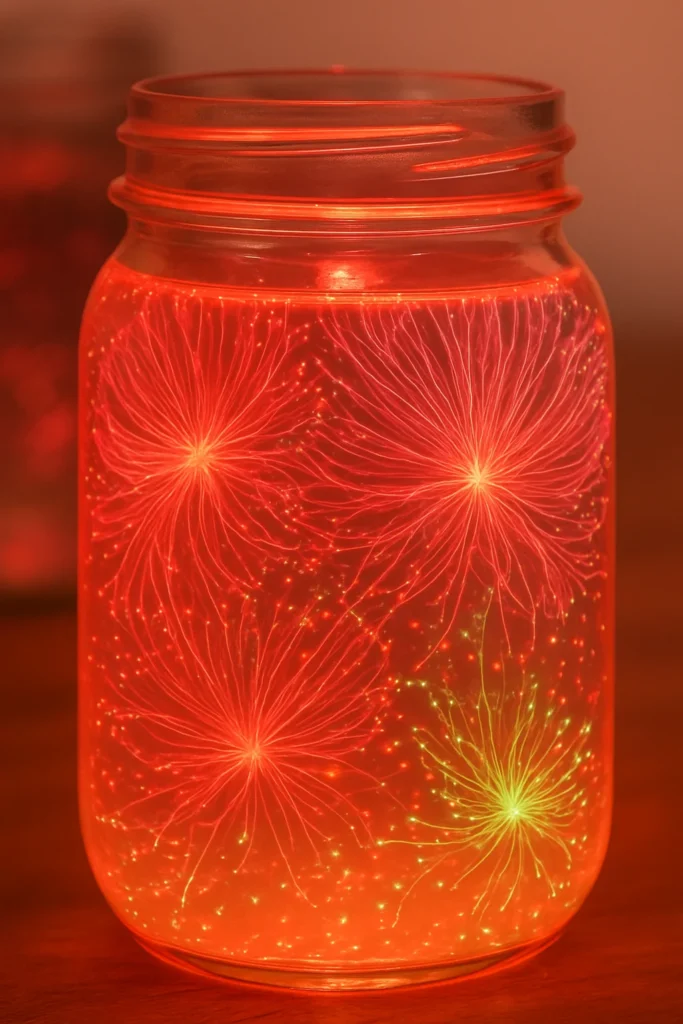
Now slowly, SLOWLY, pour that oil mixture into your jar of water. Do not dump it in like a bottle of soda on New Year’s Eve. Gently drizzle it over the top. Within a few seconds, those neon droplets will start to fall and burst open like fireworks trapped in slow motion. It’s like science and art had a baby.
❗ Real Talk: I messed this up once by stirring it. Don’t stir the water after pouring. Just let gravity and science do the work.
🔦 Step 4: Activate the Glow
Turn off the lights and break out your UV flashlight. Shine it directly into the jar and boom—everything lights up like you’ve summoned the Northern Lights in your kitchen. This step is what takes it from “cute DIY” to jaw-dropping glow in the dark activity.
If you used multiple colors, you’re about to see a literal underwater light show. No fireworks permit required.
✨ Bonus Step: Add Sparkle
Totally optional, but if you wanna go next-level, add glitter or glow powder before or after the pour. It floats, swirls, and glimmers like crazy when you shine the blacklight on it. Just know you’ll be finding glitter in your kitchen ‘til next Tuesday.
This whole process takes like 10 minutes, max. And honestly, it’s so mesmerizing that even adults can’t stop staring. I caught my brother just hovering over the jar with the flashlight like he was discovering a glowing alien egg. 😂
If your kids are visual learners or into DIY science experiments, this one’s a slam dunk. And if you’re an artsy parent like me? Oh man, you’ll get addicted to mixing different color combos just to see what kind of underwater firework finale you can pull off.
Why This Experiment Works – The Science Behind It
Okay, if you’re anything like me, you’re not just here for the glow—you’re also wondering what’s actually going on inside that jar. I’ll admit it: the first time I did this, I had no clue why the colors floated and burst like tiny glowing fireworks. I just thought it looked cool. But the science behind it? Honestly, it’s just as mind-blowing.
This is one of those oil and water experiments that sneaks in actual learning without feeling like a school lesson. It’s perfect for STEM learning at home, especially for curious kids who ask “why?” every five seconds. 😅
🧪 Oil and Water Don’t Mix (Like, Ever)
Here’s the deal: oil is less dense than water, and it repels it completely. That’s why when you pour the oil mixture on top of the water, it floats and doesn’t blend. Think of it like a lazy river that refuses to hang out with the pool below.
But when the glow paint or food coloring (which does mix with water) breaks through the oil barrier, it sinks down. As it falls, it dissolves slowly into the water, creating those dreamy, drifting, glowing bursts. Boom—glow in the dark chemistry 101.
💡 The Magic of UV Light
The glow you see isn’t just from the paint being “bright.” It’s fluorescence. The UV flashlight emits ultraviolet light, which excites the fluorescent pigments in the paint or food coloring. They absorb that invisible light and re-emit it as visible light—usually neon green, blue, or pink.
Without UV light? Meh, it’ll still look like a cool science craft. But with UV? It turns into a full-on glow show. This step is where the real UV light science comes alive.
🌈 Droplets Turn Into Fireworks
When you mix the glow paint with oil, you get tiny little droplets suspended in the oil. Once those start falling into the water, they burst apart and mix with the water, kind of like mini explosions—except totally safe and mess-free. That sudden spread of glowing color? It’s all about how liquids interact when their densities clash.
😮 Fun Fact: You can explain this whole process to your kids as a safe science experiment for kids that demonstrates density, immiscibility, and fluorescence—all in under 10 minutes!
Honestly, this is one of those STEM projects for kids that’s disguised as pure fun. It checks off science, creativity, and sensory play—all in one glowing jar. And if your kid decides to explain density at the dinner table next week, don’t say I didn’t warn you. 😉
Creative Variations and Kid-Friendly Ideas
Alright, once you’ve nailed the basic glow-in-the-dark fireworks jar, you’re officially ready to level up! The best part about this project isn’t just how cool it looks—it’s how endlessly customizable it is. I’ve done this with nieces, nephews, birthday party chaos crews… and somehow every time, it feels like a brand new STEM activity at home.
So if you’re looking to go beyond the basics, here are some fun and easy ways to turn this into an educational craft for kids that fits any occasion or creative mood.
🌈 Try a Rainbow Glow Explosion
Instead of sticking to one or two colors, go full unicorn and use all the neon paints you can find. Mix each color separately in its own little oil bowl. Then pour them one at a time into the jar. Watching them cascade and collide is like watching a galaxy form in slow motion. I did this for my niece’s birthday and she straight-up called it “glow juice.” 😂
Bonus: Kids start learning about color mixing naturally—like how yellow and blue make a weird radioactive green.
🎉 Turn It Into a DIY Party Favor
I once made mini versions of this in baby food jars and used them as take-home gifts for a glow-themed birthday bash. Tied a little tag on it that said “Thanks for glowing up with us!” Total hit. These work as DIY party favors that actually teach something.
Tip: Pre-mix the glow paint + oil, give parents the UV flashlight as part of the favor, and you’ve just delivered science + fun in a jar.
🧊 Try Ice-Cold Water for a New Look
Here’s something I tried on a whim: using ice water instead of warm. Totally changes the speed at which the droplets fall. It’s slower, more dramatic, and the colors kind of hang in mid-water before bursting. Super cool for visual effect—and doubles as a sensory science experiment.
🎄 Make It Seasonal!
You can theme this jar for holiday science crafts. Think red and green glow for Christmas, purple and orange for Halloween, or red, white, and blue for the 4th of July. Add in some glitter stars, snowflake confetti, or tiny glow-in-the-dark spiders. Now you’ve got seasonal science projects with a whole new level of fun.
Pro tip: Use star-shaped glitter in patriotic colors for an actual “fireworks” vibe.
🤲 Make It Tactile for Sensory Play
Add a spoonful of glow powder and just a few drops of dish soap—seriously—then let kids gently swirl the jar. It becomes this calming, glowing swirl fest. Works great as a glow in the dark sensory play activity, especially for younger kids or those with sensory needs. It’s like a stress jar… but way cooler.
These variations turn a basic science craft into a full-on STEM playground. Whether you’re hosting a party, looking for a boredom buster, or just trying to keep screen time down for a day, this project adapts to whatever you need.
Got a favorite combo? I’d love to hear what you or your kids came up with. We tried a galaxy theme last time and added tiny silver star glitter—looked like the Milky Way in a mason jar. 👩🔬💫
Safety Tips & Cleanup Tips for Parents
Let’s be real—any activity involving glowing liquids and small humans has the potential to get a little messy. And while this glow-in-the-dark fireworks jar project is super safe, a little planning goes a long way in keeping it that way. I’ve had glitter in my kitchen grout before (still sparkles under UV light, by the way), so yeah—this section exists for a reason. 😂
Whether you’re a science-loving parent, teacher, or cool aunt/uncle just trying to survive the weekend, these tips will keep your STEM project mess-free and stress-free.
🧼 Use a Tray or Craft Mat
Start by placing everything—jar, oil, paint, glitter—on a tray or silicone craft mat. I didn’t do this once and paid the price when oil leaked onto the table and left a lovely rainbow sheen for two days. A simple tray keeps spills contained and makes cleanup a breeze.
This is a mess-free STEM experiment as long as you contain the chaos.
✅ Stick with Non-Toxic Materials
If your kids are young or prone to sticking their fingers in everything (👀), make sure your glow paints and food colorings are non-toxic. Most craft stores label their paints for kid safety, and it’s worth checking the label twice.
And if you’re using fluorescent food coloring, bonus—it’s actually food-safe.
🔦 Supervise with UV Flashlights
Even though UV flashlights are super low risk, it’s still a good idea to remind kids not to shine them in anyone’s eyes. I’ve seen my nephew try to “laser beam” his sister, so yeah, that rule got made real fast.
If you’re working with younger kids, keep the flashlight in your hands and let them view the jar from behind your light. It becomes a fun light show that’s still a safe science activity for kids.
🧴 Have Wipes or Soapy Water Ready
Glow paint and oil aren’t toxic, but they’re slippery and sometimes stubborn to clean off skin or tables. I keep a small bowl of warm soapy water nearby with some rags or baby wipes. Easy fix, no panic.
Oh—and if you’re using glitter? Accept that it’s now part of your home’s aesthetic.
🗑 Cleanup and Disposal Tips
Once the glow show is over, don’t just dump the whole jar down the sink—especially if you’ve used a lot of oil. Pour off the top oil layer into a jar or container, and toss it in the trash. The water and leftover paint can usually go down the drain with no issue, followed by hot water and soap.
If you’re saving the jar for later, give it a solid rinse and dry before storing. Otherwise, it may smell… weird. Trust me. 🫠
This whole project takes like 10 minutes to set up, and maybe 5 to clean up—if you follow these tips. That’s what makes it such a great go-to when you want a quick, safe win with your kids. You’ll keep the science fun high and the stress low, which is honestly the parenting dream when it comes to DIY educational crafts.
And there you have it—your own magical, glow-in-the-dark fireworks show in a jar! Whether you’re wrangling toddlers, planning a party, or just looking for some at-home science fun, this glow in the dark jar activity delivers every time. It’s simple to prep, wildly entertaining, and sneaks in some actual science learning without anyone realizing they’re doing a lesson.
What I love most is how this project checks all the boxes: it’s visually stunning, totally customizable, and super safe. Plus, it turns any ordinary day into an unforgettable moment of creativity and wonder.
Want your friends to join in on the fun? 🌟
Share this project on Pinterest and spread the glow! From DIY science for kids to easy STEM crafts, this one’s a guaranteed scroll-stopper. You’ll inspire other parents, teachers, and creators to light up their own jars—and their kids’ imaginations.
🖼️ Got a masterpiece to show off? Tag it with #GlowJarScience and let’s see your wildest color combos and glitter explosions.
