


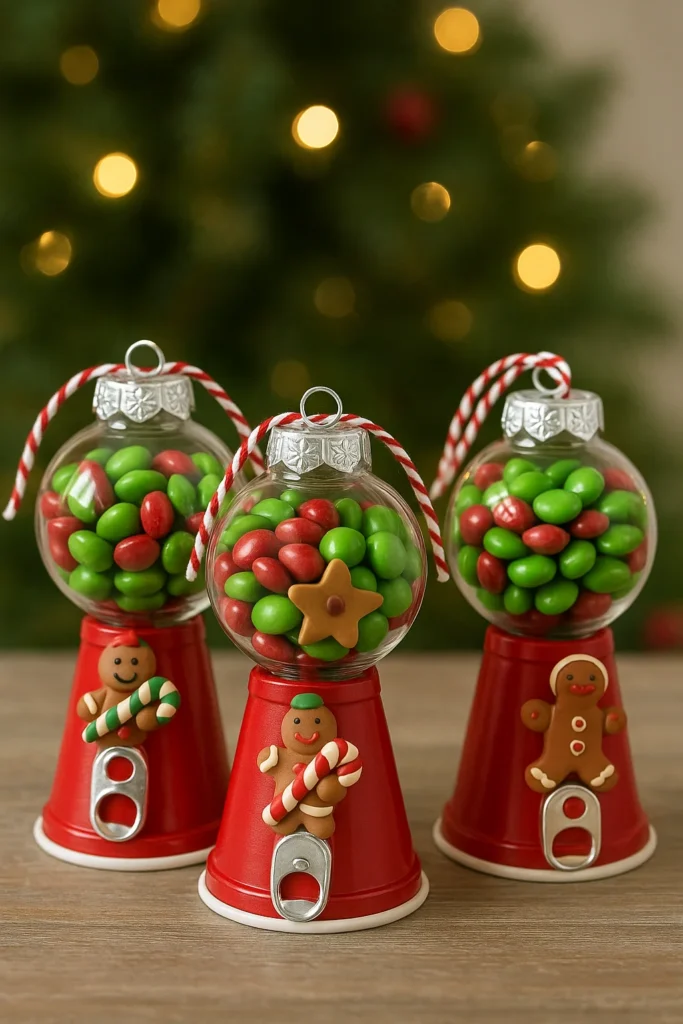
Who doesn’t love a craft you can snack on? In 2025, DIY holiday decorations are trending more than ever—and these Mini Cup Candy Ornaments are a sugary hit. Combining crafting with candy (yes, you read that right), this project is super affordable, incredibly cute, and totally beginner-friendly.
According to a recent Pinterest trend report, handmade holiday décor has spiked in searches by over 200%—so you’re in good company. Whether you’re prepping for a cookie exchange, decorating the classroom, or looking for a memorable stocking stuffer, this sweet little project will have everyone grinning ear to ear. Let’s dive into the glittery, gluey, and downright tasty world of candy ornaments!

Supplies You’ll Need for Mini Cup Candy Ornaments
Alright, so let me spill the glittery truth—I’ve made these little candy cup ornaments every Christmas since 2019. It started as a fluke after I found a bag of clear ornaments on clearance and had zero idea what to do with them. Fast forward, and now they’ve turned into my go-to budget-friendly gift and one of my favorite DIY Christmas decorations.
The Basics You Gotta Grab
- Small Plastic Cups – You’ll usually find these near the mini liquor bottles in Walmart or the grocery store. They’re basically plastic shot glasses, but holiday edition!
- Clear Fillable Ornaments – Dollar Tree is a goldmine for these. I buy them by the dozen. These are the heart of the whole thing.
- Candy – I love tossing in peppermint kisses, red-and-green M&Ms, or mini Reese’s. But any small candy works. Just don’t use unwrapped ones unless you want a sticky situation.
- Hot Glue Gun – This is non-negotiable. You need a hot glue gun project that holds like it means it. Craft glue’s okay, but it takes forever to dry and doesn’t stick as strong.
Cute Stuff That Makes It Pop
- Pop Tabs – Yes, from soda cans! I’ve got a weird stash I’ve hoarded, but they make the perfect faux ornament top.
- Buttons – These go right over the pop tab to add a polished look. Vintage buttons? Even better.
- Ribbon or Twine – For hanging. I like twine for that rustic, farmhouse look. But shiny ribbon? Chef’s kiss.
Optional Extras (aka “Pinterest Gold”)
- Glitter glue (if you’re brave)
- Holiday stickers or washi tape
- Name tags for personalization
I’ve even let my niece help one year—talk about crafting for kids with a sugar rush. It’s a little messy, but it’s the kind of Dollar Tree DIY that creates memories and looks like you spent way more than you did. Total win.
My Tip? Prep a Crafting Station
Lay down newspaper or an old tablecloth, plug in your glue gun, and set up a little assembly line. It feels like Santa’s workshop, minus the reindeer.
And for real—don’t skip the pop tab + button combo. It transforms the whole thing from “plastic cup with candy” to handmade holiday gift worthy of a spot on the actual tree. Or at least the classroom party table.
I’ve had neighbors ask me, “Where did you buy these?” That’s when you know your Christmas party ideas just won the neighborhood.
Step-by-Step Instructions for Assembling Your Candy Ornaments
So here’s the deal—once you’ve got all your supplies laid out, you’re about 15 minutes away from having the cutest little DIY Christmas crafts you’ve ever made. The first time I did these, I overcomplicated the heck out of it. Trust me, you don’t need a Cricut or a crafting degree. Just some candy, glue, and a little patience.
1. Fill the Ornaments Like a Pro
This part’s fun… unless you buy oddly shaped candy that won’t fit. Been there. Mini M&Ms are my go-to—super colorful and easy to pour. I use a funnel (or just fold paper into a cone) to slide the candy in without it flying all over the place.
Tip: Don’t overfill. Leave just a tiny bit of wiggle room so you can snap the ornament closed easily without candy trying to escape.
2. Glue the Ornament to the Cup
Now here’s where the hot glue gun tips matter. You want a solid glue line around the lip of the cup—not too thick, not too thin. If the glue cools too fast, it won’t stick. If it’s a gluey mess, the ornament wobbles. Took me three tries to figure out the sweet spot.
Set the filled ornament on the glue-covered rim of the cup and hold it for 10–15 seconds. Boom—base is done.
3. Pop Tab Magic
This part? Genius. You take a clean soda can tab, glue it to the bottom of the cup (which is now the “top” of your ornament). Then glue a cute button right over the middle of the tab. Looks legit like a store-bought ornament hanger. It’s one of those little Christmas ornament ideas that makes a big difference.
4. Add the Festive Fluff
Tie a bow with ribbon or twine and either hot glue it right under the ornament globe or around the cup rim. If you’re feelin’ extra, toss in a sticker or mini name tag.
One year I used glitter spray and… never again. Looked magical but I was vacuuming for days.
Mistakes I’ve Made (So You Don’t Have To)
- I used candies that melted—bad idea.
- Tried double-sided tape instead of glue—it fell apart.
- Forgot to test if the ornament could hang—yep, it flipped upside down.
This is one of those easy holiday crafts that even kids can help with, but it still feels like something you’d find at a fancy Christmas market. Best part? You get to eat the leftovers. Or just “accidentally” overfill one ornament and call it taste-testing.
These make stellar handmade Christmas gifts for teachers, neighbors, or honestly… yourself. They’re cute, cheap, and feel way more thoughtful than just tossing a candy cane in a gift bag.

Candy Ideas and Filling Variations
Let’s be real—what’s inside the ornament is half the fun (okay, maybe 80% if you’re a sugar lover like me). The first year I did these, I just grabbed whatever candy I had leftover from Halloween. Spoiler alert: orange and black don’t scream “Christmas.” So yeah, lesson learned.
Here’s a cheat sheet of candy combos I’ve tried that are total crowd-pleasers—and some that were… not.
Festive & Foolproof Candy Fills
- Mini M&Ms – Classic and colorful. They fill the ornament beautifully and match any theme.
- Peppermint Kisses – Adds that nostalgic Christmas vibe. Great for Christmas candy gifts.
- Mini Reese’s – A little tricky to fit, but worth it.
- Red & Green Skittles – Tart, bright, and cheerful.
- Hot Cocoa Mix + Mini Marshmallows – Yes, this works! Seal the ornament well and it becomes a hot cocoa bomb alternative.
These work great when you’re aiming for a polished look. They also go with almost any theme—from Christmas gift basket ideas to teacher treats.
Themed Combos I Swear By
- Gold and White – Buttermints + gold-wrapped chocolates = elegant and subtle.
- Grinch Theme – Lime green candies with one red heart candy mixed in. Instant winner with the kids.
- Candy Cane Explosion – Crushed peppermint bits and mini candy canes = a crunchy, minty twist.
And yes, I 100% made a “Santa’s Snack” one with red M&Ms and white gumdrops. Pinterest-worthy or bust.
Allergy-Friendly & Sugar-Free Options
We had a school party last year, and one mom asked for sugar-free Christmas treats. Honestly, I panicked. But turns out you can get sugar-free peppermints, Werther’s, and even low-carb chocolate chips in bulk.
If you’re gifting in a classroom or office, toss in some labeled allergy-safe mixes. Think nut-free, gluten-free, or vegan options from the health aisle or Amazon bulk packs. Your recipients will notice and appreciate the thoughtfulness.
What NOT to Use (Yeah, I’ve Tried It)
- Gummy candies – They sweat inside the ornament. Ew.
- Unwrapped chocolate – Melts and smears. Just… no.
- Loose powdered sugar stuff – Like truffles or sugar-dusted jelly candies. It makes the ornament look dusty, not festive.
Oh, and one time I used candy canes without sealing them and they broke inside. Looked like glass shards. Fun.
Bottom line? Stick to sturdy, colorful, non-sticky candy. And if you’re making these in bulk for parties, go for bulk candy for holidays to keep it cheap without looking cheap.
This section is where you can really let your creative side go wild. Whether you want elegant or extra, sweet or themed, there’s a candy combo waiting to be discovered—and eaten.
Decorating and Customizing for Maximum Festivity
Okay, confession time—I’m a little obsessed with ornament bling. I used to just glue on the candy-filled ornament and call it a day. But once I started really decorating them? Game over. People were asking me if I bought them at a boutique. (Nope, just me, some ribbon, and a glue gun that’s seen better days.)
Ribbons, Bows, and Twine—Oh My
Let’s start with the easiest glow-up: ribbon. You can snag rolls of holiday ribbon for a buck at Dollar Tree or Walmart. I love mixing textures—like burlap twine paired with shiny red satin. Wrap it around the base of the ornament or tie a tiny bow on top. It takes 30 seconds and gives off serious custom holiday gifts vibes.
For rustic flair? Use jute or twine. For glam? Gold curling ribbon or metallic thread. Don’t overthink it—just match the vibe of your tree or the person you’re gifting to.
Name Tags and Personalization
This is where it gets next level. Add mini name tags using cardstock and a Sharpie, or print out names with a label maker. I’ve even used mini wooden letter beads (the kind for bracelets) to spell names on twine loops. Instant personalized Christmas ornaments status.
Pro tip: Add a tiny bell or charm with the name tag. It jingles and makes the ornament feel extra magical. Especially if it’s for a kid—or a kid-at-heart.
Stickers, Vinyl, and Paint Pens
If you’ve got access to a Cricut (or a friend who does), vinyl decals are a dream. But honestly? I’ve used metallic paint pens from the dollar aisle to write “Merry & Bright” or “Jolly AF” (okay, maybe not for the kids’ version) right on the ornament globe. It’s fast, fun, and looks super polished.
Holiday stickers work great too—especially for kids doing holiday crafts. I keep a stash of snowflakes, Santa faces, and gingerbread men for quick stick-on sparkle.
Themes to Try
- Farmhouse – Think black-and-white plaid ribbon, neutral buttons, and wood accents.
- Traditional Christmas – Red bows, gold stickers, and candy cane colors.
- Winter Wonderland – Blue and silver tones with snowflake stickers and glitter ribbon.
- Elf Workshop – Bright green, red, jingle bells, and goofy faces drawn on the cups.
You can go full-on Christmas tree decoration tips mode and match your tree’s color scheme, or make each one its own little surprise.
A Few Things I’ve Learned the Hard Way
- Don’t use craft paint unless it’s made for plastic. It peels.
- Don’t use thick ribbon near the glue spot—it melts.
- Don’t over-decorate. Sometimes, simple is festive enough.
This part of the project is where the magic really happens. It’s how a plastic cup becomes a keepsake. Whether you’re making a dozen for the office party or just a few for your own tree, this is your moment to shine. Literally—add glitter if you dare.
Gift Ideas and Creative Uses
Now here’s where things get real fun—figuring out who actually gets one of these adorable candy bombs. At first, I just made them for my own tree, but once word got out (aka, I posted on Instagram), everyone from my mail carrier to my cousin’s kid wanted one. They’re cute, cheap, and totally customizable, which makes them the perfect Christmas gift idea for just about anyone.
Teacher Gifts Without the Mug
Listen, teachers don’t need another mug. I said it. But they will flip over a sweet, handmade treat with their name on it. I usually throw the ornament in a little cellophane bag with a holiday tag that says “Thanks for making the season sweet!” Boom—instant DIY gift for teachers that feels thoughtful but doesn’t drain your wallet.
Office and Classroom Party Favors
Last year, I made 24 of these for my kid’s class in one night. Chaos? Yes. Worth it? Absolutely. They were a hit. And for office parties, stack a few in a festive basket on the snack table—they double as decor and dessert. Perfect holiday party favors.
You can even add name tags and use them as place cards at the dinner table. I did this for Christmas Eve once and people ended up taking them home as souvenirs. Cute and functional.
Stocking Stuffer Gold
If you’re filling stockings this year and want something other than socks and Tic Tacs, these little ornaments are a slam dunk. Nestle one into the top of a stocking and it instantly looks more “Pinterest mom” than “I forgot to shop.” They check all the boxes for a DIY stocking stuffer—sweet, personal, and under $2 each.
Gift Basket Game-Changer
These little guys take a basic gift basket to the next level. Toss one in with a cocoa mix, some cozy socks, and a dollar-store mug and suddenly you’ve got a creative holiday gift that looks like you planned it for weeks. Spoiler: you didn’t.
Mail Carrier, Hair Stylist, Delivery Folks? Covered.
Seriously, if there’s someone you want to say “thanks” to during the season without spending $25 a pop, this is your move. I leave a few by the front door for delivery drivers and stash a couple extras in my purse—never know when you’ll need a surprise homemade holiday present.
Last-Minute Lifesaver
More than once, I’ve been caught in that “Oops, I forgot a gift” panic. Having a few of these prepped and stored in a bin has saved me every time. They’re the ultimate budget Christmas gift hack—and honestly, people love them more than store-bought stuff.
So yeah, these mini candy ornaments aren’t just cute—they’re functional, versatile, and seriously delightful. Whether it’s for a party, a present, or a last-minute gesture of holiday spirit, they’ve got you covered.
And just like that—you’ve turned plastic cups and dollar-store finds into handmade Christmas ornaments that people actually want. Wild, right?
I swear, every time I hand one of these out—whether it’s a teacher, a neighbor, or the Amazon driver—they light up like it’s a gourmet gift basket. And the best part? These ornaments cost less than a fancy latte to make. That’s the magic of easy DIY Christmas gifts—they look like you put in way more effort (and money) than you actually did.
Whether you’re in it for the fun, the savings, or just want an excuse to break out the hot glue gun again, these mini cup candy ornaments totally deliver. They’re quick, they’re fun, and they’re the perfect affordable holiday craft whether you’re making five or fifty.
If you loved this tutorial, share it with a friend or pin it to your festive holiday ideas board on Pinterest. Let’s spread some sugar and sparkle this season—one cup at a time.

