

Ready to turn your kitchen into a bubbling science lab? 🎃 I’ve got the Baking Soda Fizzing Ghost Art Eruption you have to try this Halloween! It’s not just art, it’s not just science—it’s a wild combo of fizz, foam, and festive fun. According to a survey by Edutopia, kids retain 75% more when learning is hands-on. So why not sneak in some chemistry while making spooky ghost art that’ll wow any tiny trick-or-treater?
Supplies You’ll Need to Create a Fizzing Ghost Eruption
I’ll be honest—before I tried this, I thought you needed a whole lab setup to pull off anything that looked even remotely like a home science experiment. Spoiler alert: You don’t. Everything you need is probably already in your kitchen. And if it’s not? The dollar store’s got your back.
My Halloween Must-Haves
The first time I did this with my niece, I just grabbed a baking tray, some old food coloring, and a half-used bottle of vinegar. She ended up having the time of her life. So now, I keep a little bin labeled “kids STEM activities” with all the good stuff inside:
- ½ cup of baking soda – Seriously, buy this in bulk if your kids are science lovers. It’s the backbone of so many preschool learning activities.
- White vinegar – Any brand works, but I always make sure to pour out enough to really get that foamy fizz. Usually around ½ cup does the trick.
- Dish soap – This is the secret sauce. A few squirts makes everything bubble like a witch’s brew.
- Food coloring or liquid watercolors – Go for the spooky ones: purple, orange, green, and blue. This turns it from a fizz to a Halloween craft for kids.
- Shallow tray or plastic bin – Use something wide with a little depth. I learned the hard way that cookie sheets let stuff run off the sides—messy nightmare!
- Plastic pipette or dropper – Trust me, kids LOVE dripping vinegar onto stuff. It gives them control, which makes the reaction feel like magic.
- Optional: tiny plastic spiders or googly eyes – I always throw these in for the “ewww” effect. Makes the photos look cooler too, if you’re planning to share on Pinterest.
Real Talk: Don’t Skip the Tray
I once let my niece do this on a plate… ON A TABLE. Yeah, rookie move. Ended up with colorful, soapy slime running all over my wood grain. The plastic bin? Total game changer. Contains the mess and adds to the “science lab” vibe.
If you’re a parent or teacher, this activity nails it on all fronts—it’s cheap, it sneaks in learning, and it gets the kids off screens for more than 10 minutes. That’s a win.
And hey, if you’re doing this as part of your science experiments for kids at home, go ahead and line everything up the night before. I like to prep trays in advance for classroom settings or even Halloween parties.
Create the Marbled Vinegar Base for Your Tray
Okay, this part is where things start lookin’ real Pinterest-worthy. If you’ve ever wanted your Halloween sensory activity to feel like something out of a mad scientist’s lab—or a tie-dye explosion from outer space—this is where the magic happens.
The Secret Sauce: Color + Foam
I remember the first time we did this, my nephew dumped all the food coloring into one spot. The result? Brown sludge. 😬 Since then, I’ve learned a thing or two.
Here’s how you get that beautiful, marbled look:
- Fill the tray with white vinegar until it’s about ¼–½ inch deep. You want enough for the fizz but not so much it floods the whole ghost.
- Add a few squirts of dish soap. Just enough to give it that foam-on-top look. This is crucial for those fizzing science experiments to really pop.
- Drop in food coloring one drop at a time—go slow. Use contrasting colors like purple and orange or blue and yellow. This is the trick to getting that wow-worthy swirl effect.
- Use a toothpick or skewer to swirl lightly. Think less “mix it up” and more “drag the colors like spooky marble art.”
The first time I did this for a preschool Halloween party, I forgot the dish soap. The reaction still worked, but the fizz was kinda flat—like soda that’s been open too long. Now I never skip that step.
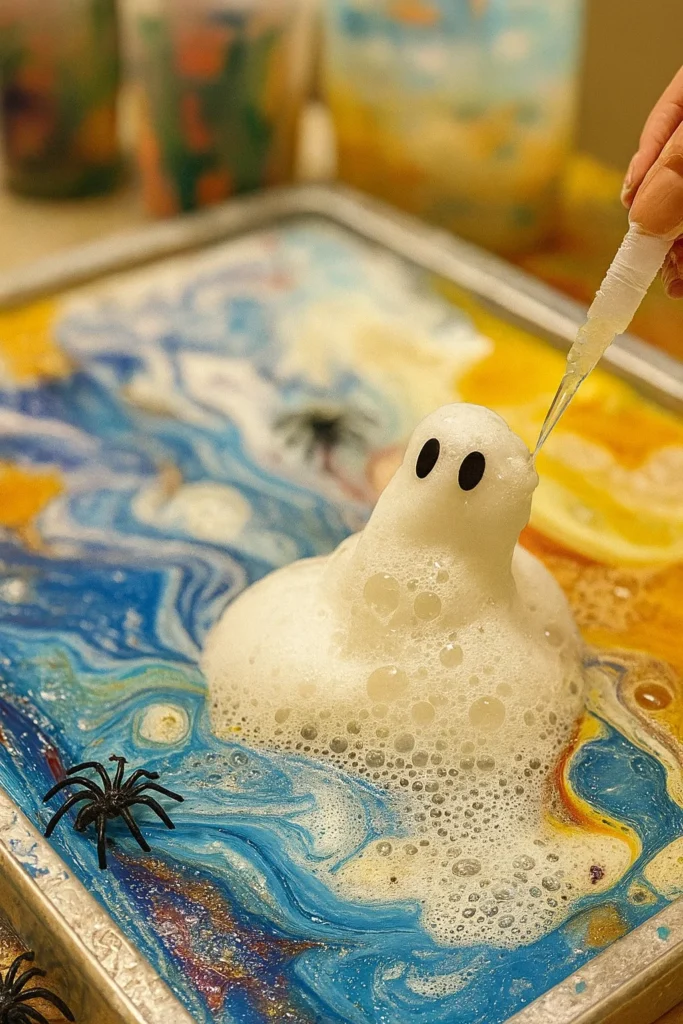
Bonus Tip: Add Spiders or Glitter
Wanna go full spooky? Toss in some tiny plastic spiders or black glitter. The kids lose it when a fizz wave sends a spider floating across the tray. It’s like a STEM craft for kids AND a haunted swamp scene in one go.
This part is also great for hands-on learning. I like to let the kids pick and drop the colors themselves. It’s messy, yeah, but they get to see how different colors interact. Plus, swirling colors is oddly soothing—like Halloween therapy.
And hey, don’t panic if the colors start to mix too much. Even a tray that turns dark still erupts like crazy once the ghost goes in. It’s not about being perfect—it’s about letting the little ones explore through this preschool STEM project that’s just as fun as it is educational.
Make and Mold Your Fizzing Ghost
Alright, here comes the star of the show—the ghost! I gotta say, there’s something super satisfying about squishing together a little blob of baking soda and turning it into a ghost that’s about to foam its spooky little heart out.
Mixing the Magic Paste
So the first time I did this, I was way off. I dumped in too much vinegar trying to be “helpful” and ended up with a puddle instead of a paste. Lesson learned: less liquid is more. Now I go with this solid method every time:
- ½ cup baking soda – This is your base. Don’t skimp, it needs to hold shape.
- A few squirts of dish soap – This adds that gooey, moldable texture. Plus, more bubbles!
- Just a few drops of vinegar – Stir it in slowly until you get a thick paste. If it’s too wet, it won’t hold. If it’s too dry, add a drop more vinegar.
Once you’ve got the right texture, it’s time to mold. You can do this with your hands, or let the kids go wild. Flat bottoms work best so it doesn’t tip over during the eruption.
Decorating? Yes, Please
I let the kids stick googly eyes into their ghosts last year. HUGE hit. One of them even added glitter (because of course). You can totally personalize these—turn it into a DIY Halloween activity for kids where they each make their own character ghost.
When I do this as a homeschool science project, I even sneak in a mini anatomy lesson. Like, “Hey, what part of the ghost is this?” while they mold the arms or mouth. It’s silly but sneaks in that toddler STEM fun in a hands-on way.
And don’t worry if your ghost looks like a snowman after a rough night. The fizz will make it look way cooler once it erupts.
Quick Tip: Pre-Make the Paste
If you’re short on time or prepping for a class or party, you can totally mix the ghost paste ahead of time and keep it in an airtight container. I usually do this for school events where I’m juggling ten things at once.
Bottom line? This step blends educational crafts with sensory play—and it’s basically foolproof once you nail the texture.
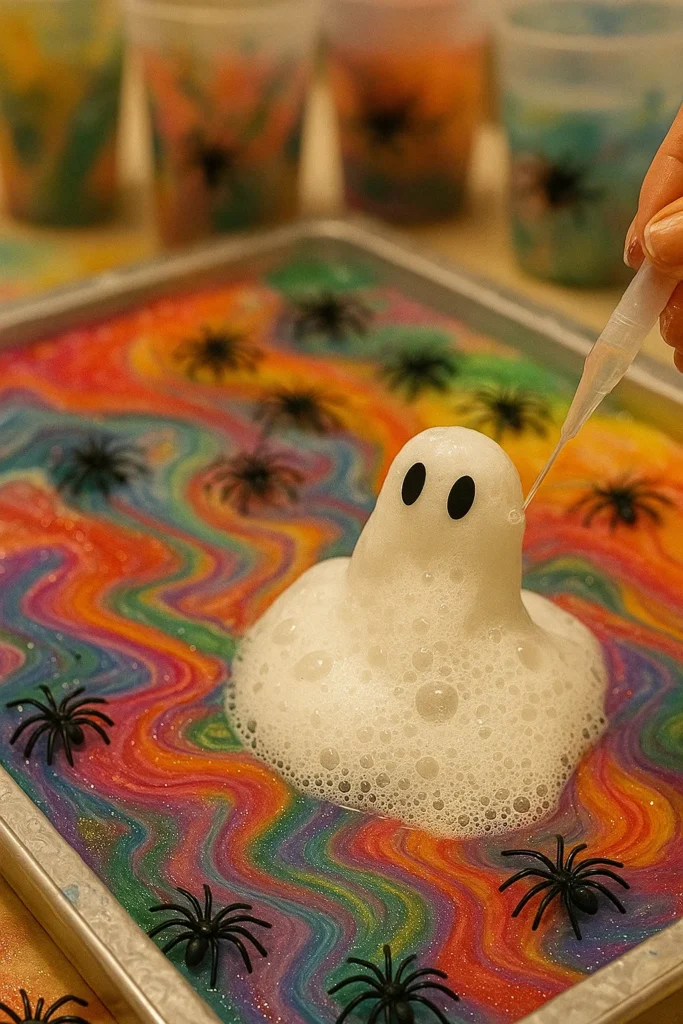
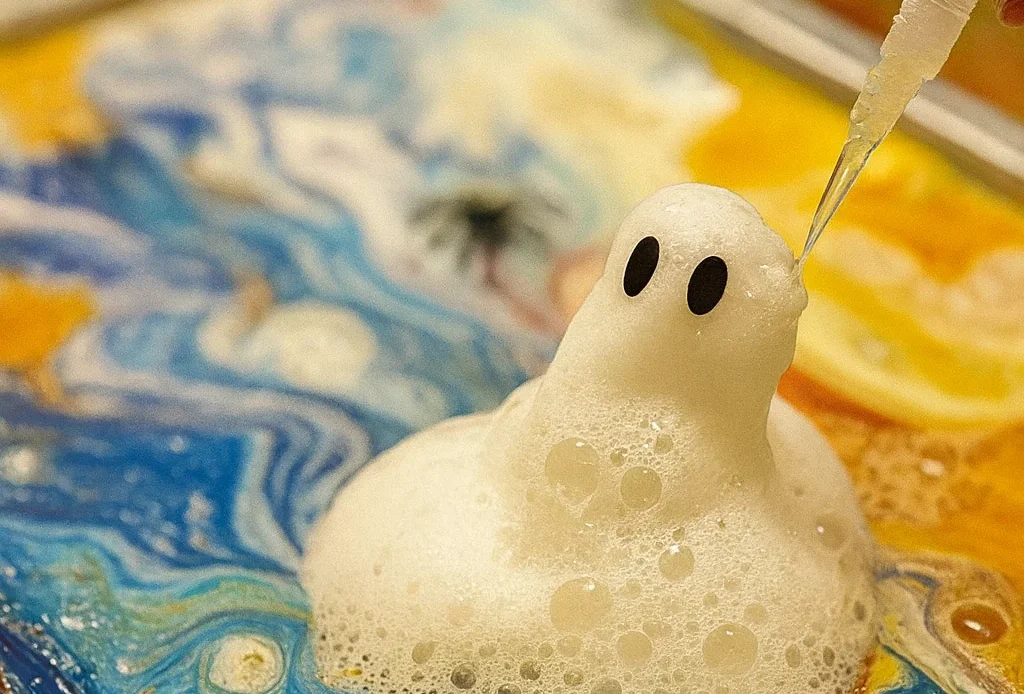
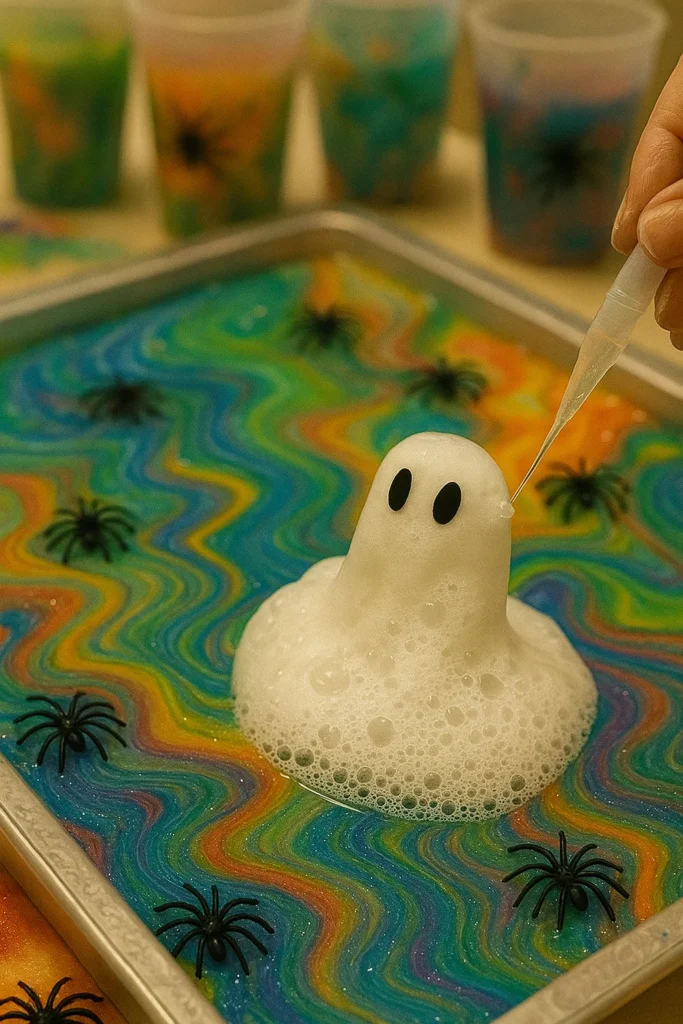
Time to Erupt—Watch the Spooky Science Show
Now for the fun part—the eruption! I don’t care how old you are, watching that ghost bubble and hiss like it’s casting a spell never gets old. And for the kids? This is straight-up science fun for kids turned Halloween spectacle.
The Moment of Magic
So here’s how I set it up: once the marbled vinegar base is ready and the ghost is chilling (creepily, of course) in the middle of the tray, I hand over a pipette to each kid. That’s when the squeals start.
- Slowly drip vinegar onto the ghost—right over the top.
- Watch the reaction as foam erupts and colors swirl.
- Point out the science if you wanna sneak in a lesson: “That’s a chemical reaction between baking soda (a base) and vinegar (an acid)!”
It’s wild how quick it goes from calm and cute to bubbly mayhem. That ghost fizzes like it’s alive, oozing down into the colorful base and sending little foam rivers in every direction. It’s the ultimate interactive Halloween activity—and honestly way cooler than any store-bought craft kit.
Tip: Give Everyone a Turn
Last Halloween, I had six kids around the table at once. We used multiple ghosts in the same tray, and it turned into a ghost army bubbling all over the place. Chaos? Yes. But totally controlled, colorful chaos. If you’re planning a Halloween party for kids, this is a top-tier crowd-pleaser.
If you’re doing this one-on-one or in a holiday experiment for preschoolers, let the kid lead the reaction. It builds patience and curiosity. Plus, who doesn’t love being in charge of something that fizzes?
Keep It Going
After the main fizz is done, I always let them go a few more rounds with extra vinegar. It extends the fun and gives them time to ask questions, like “What happens if I poke it?” or “Can I add more colors?” And sure—why not? It’s a hands-on STEM project, not a museum exhibit.
Trust me, this part creates the memories. It’s the kind of activity they’ll tell Grandma about later, complete with wild hand motions and foam sound effects.
Clean-Up and Storage Tips for Less Mess
Okay, real talk—this fizzing ghost experiment is awesome… until it’s time to clean up. I’ve made every mistake in the book, from using a tray with no lip to thinking, “Eh, it’s just a little vinegar.” Spoiler: vinegar everywhere.
Contain the Chaos (Literally)
My first tip? Use a deep plastic bin instead of a baking tray if you’re doing this indoors. Those dollar store dish tubs? Perfect. They’ve saved my kitchen table more times than I can count. Whether it’s a Halloween project for toddlers or a whole classroom of kiddos, containment is your best friend.
- Line your table with a trash bag or old newspaper—you’ll thank yourself later.
- Have paper towels or wipes handy. Don’t wait until the eruption is over. Be ready.
- Wear play clothes. I once had a kid show up in a white shirt… yeah, that didn’t end well.
What to Do With the Leftovers
After the foam dies down and the “oohs” and “ahhs” are over, just pour the liquid down the sink. It’s safe—nothing toxic here. I usually rinse the tray with warm water and dish soap, then let it air dry.
For leftover baking soda paste? I scoop it into a container and label it “ghost guts.” The kids find that hilarious. You can totally reuse it the next day if it hasn’t dried out. That’s a bonus for budget-conscious folks like me running teaching science at home on a shoestring.
Storage Tips
If you’re prepping this for a classroom or party, here’s what I do:
- Pre-mix the vinegar base in a sealed bottle
- Store baking soda in a zip-top bag
- Pack all small supplies in a labeled bin (I have one that says “Fizz Kit”)
This makes repeat sessions way easier, especially if you’re doing preschool classroom activities back-to-back. Less scrambling = more science fun.
The Golden Rule of Mess-Free Fun
Let’s be real—no easy clean-up activity for kids is truly “mess-free.” But this one comes pretty close if you prep right. And it’s 100% worth it. The learning, the giggles, the gooey hands covered in ghost foam? Totally priceless.
There’s just something magical about turning baking soda and vinegar into a bubbling ghost eruption, isn’t there? This whole project combines everything I love—fun science at home, hands-on play, creativity, and just the right amount of spooky chaos. It’s proof that Halloween STEM for kids doesn’t have to be complicated or expensive.
Whether you’re a teacher running educational Halloween ideas in the classroom, or a parent looking to level up your holiday sensory activities at home, this ghosty fizz-fest hits the sweet spot. It’s messy, but manageable. Silly, but smart. And best of all? It gives kids the freedom to experiment, giggle, and learn all at once.
So, if your little ones loved it as much as mine did, snap a few pics of their fizzing ghosts and pin them on Pinterest! You’ll inspire someone else’s science adventure—and trust me, they’ll thank you later.
Until next time, keep your ghosts bubbly and your cleanup easy. 👻💥
