

Have you ever shaken a glitter jar and felt instantly calmer? Now imagine adding dolphins, mermaids, and seashells to the mix. That’s what this DIY Under the Sea Jar is all about—a glittery, swirling underwater world that kids and adults will both adore. Inspired by sensory play and ocean vibes, this craft is not just mesmerizing—it’s educational too! According to studies, sensory bottles can reduce stress and improve focus in children. Plus, who doesn’t love a bit of sparkle?
Supplies You’ll Need for Your Sea Jar
Okay, I’ll be honest—when I first decided to make this DIY sensory bottle, I underestimated how soothing it’d be for me, not just my kids. There’s something strangely therapeutic about watching glitter swirl around tiny sea creatures. But before we get to the fun part (aka shaking it like a snow globe), let’s talk supplies.
🛠 What You’ll Need (and What I Learned the Hard Way)
Here’s the full list—plus a few notes from trial and error (because yes, I did try to use table salt instead of glitter once… bad idea):
- Clear Jar (Plastic or Glass):
I always go with plastic for the kids’ jars. Fewer heart attacks if someone drops it. But if it’s just for display, a glass mason jar looks chef’s kiss on a shelf. - Glitter & Sequins (The Stars of the Show):
Use fine glitter for smooth swirling and chunky glitter for extra sparkle. Trust me, combining both makes it look like a real underwater galaxy. - Mini Plastic Sea Creatures:
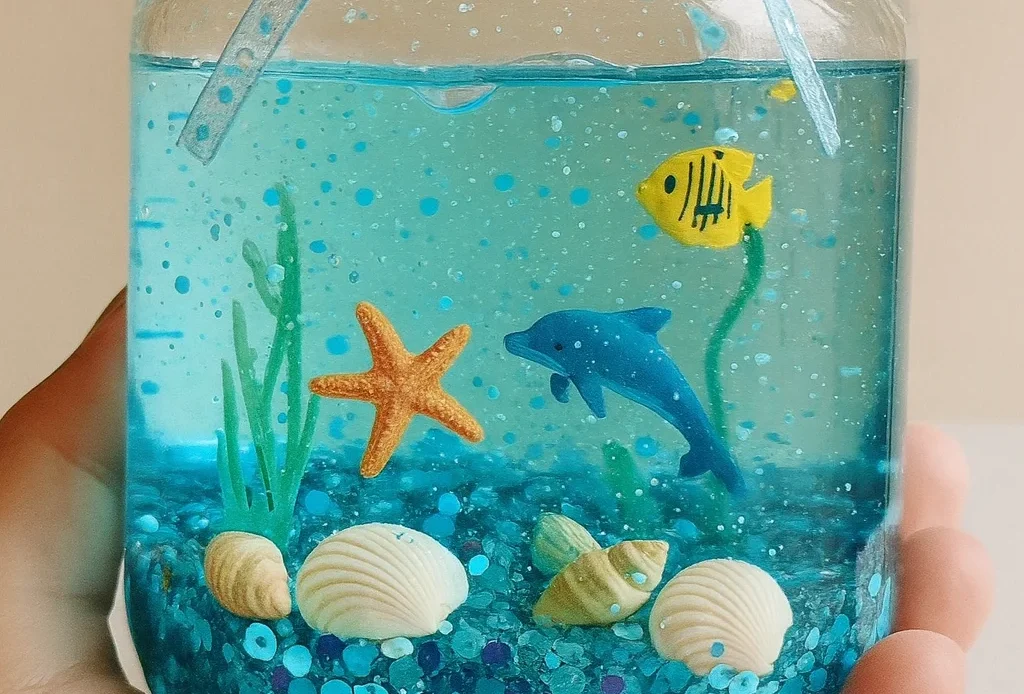
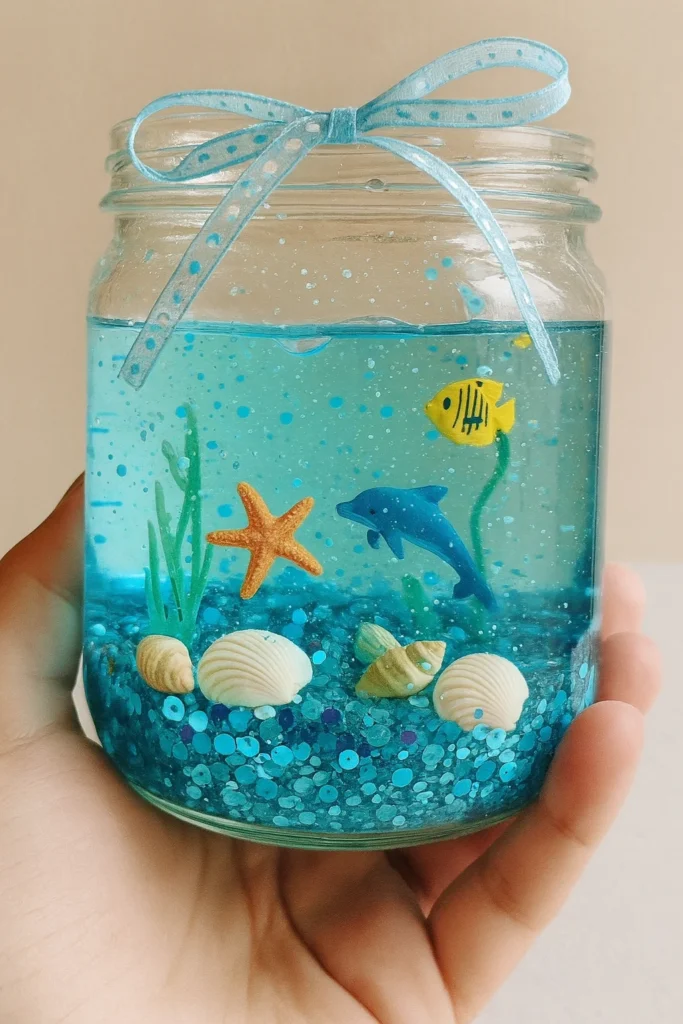
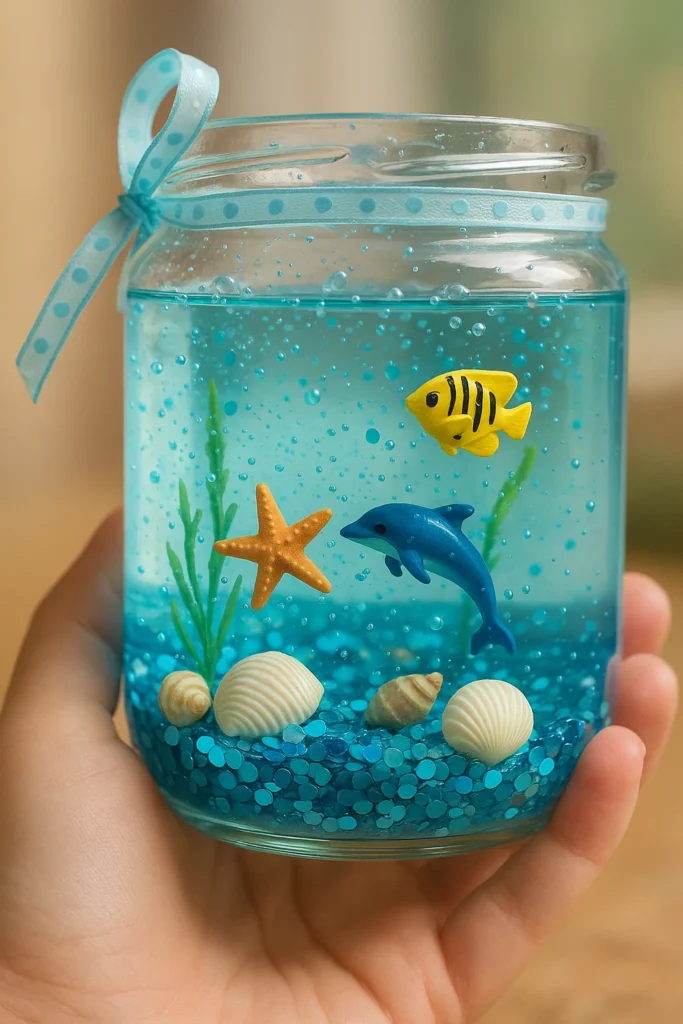
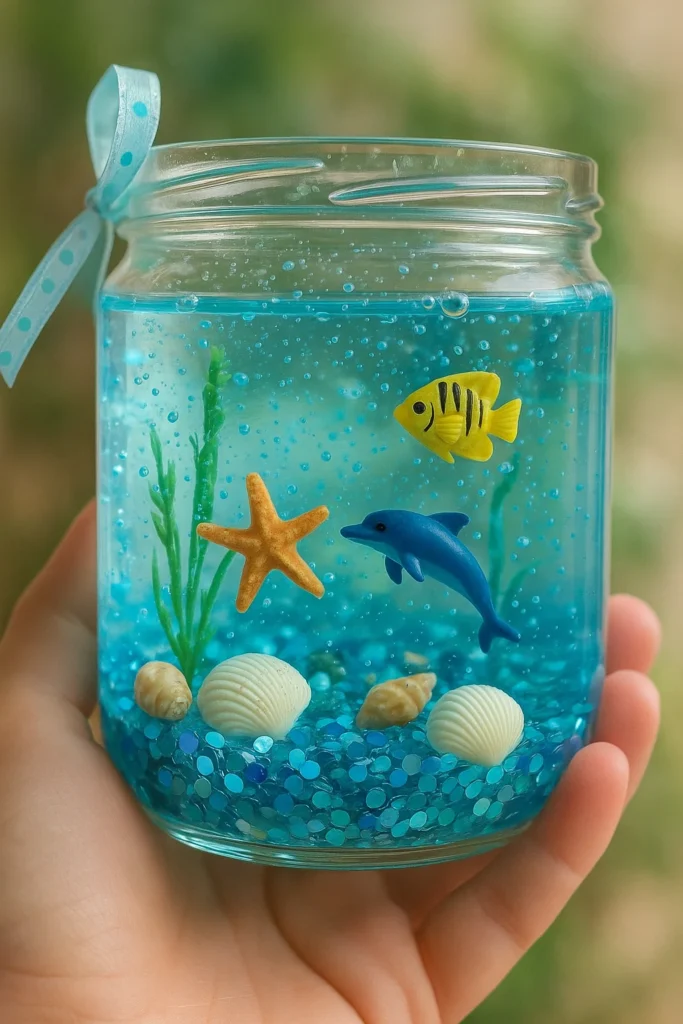
Think sharks, dolphins, starfish, and tiny mermaids. I grab mine in bulk on Amazon—search for “mini ocean animal toys.” You’ll thank me later. - Clear Glue or Glycerin:
This is what makes everything move in that slow, dreamy way. I used Elmer’s clear glue once and glycerin another time. Both work, but glycerin gives a better “lava lamp” effect. You can even use baby oil if you’re desperate. - Warm Water:
Sounds basic, but it helps the glue mix better. Cold water made mine look cloudy once. - Blue Food Coloring (Optional, But Worth It):
A drop or two goes a long way. Seriously, just one drop unless you want a jar that looks like the Mariana Trench. - Hot Glue Gun:
This isn’t just for crafty moms—it’s for keeping your sanity. Glue that lid shut, or you’ll be crying over spilled glitter. Literal glitter. - Extras: Shells, Beads, Ribbon, Stickers:
These are the fun bits. I let the kids add whatever makes it feel beachy. And if you wanna get Pinterest-fancy, wrap a ribbon around the lid and stick on a few underwater-themed stickers.
🧠 Quick Tips from My Craft Table:
- Always mix the water and glue before adding glitter—less clumping.
- Don’t overfill the jar, or you won’t get that cool wave effect.
- Buy glitter with larger flakes too—it reflects more light and catches the eye better.
I swear, just gathering these supplies had me feeling like I was prepping for some magical underwater adventure. And if your kids are into DIY calming toys or sensory activities, this one’s going to be a hit.
Step-by-Step Instructions for Crafting Your Jar
Alright, let’s dive in—pun intended. 😄 I’ve made these DIY calming jars a dozen times (some turned out better than others), and here’s my go-to method that gets those sparkles swirling just right every single time.
🧽 Step 1: Clean the Jar (This Is Where I Messed Up Once)
Sounds obvious, but one time I didn’t wash the jar properly and there were weird floaties in the water. Not cute. Just give it a good rinse with warm soapy water and dry it thoroughly. Any leftover label glue or dust? That’ll mess with your ocean vibe.
🐠 Step 2: Add the Ocean Magic
Now for the fun part. I let the kids pick 3–5 mini sea creatures each—too many and it starts to look cluttered. We toss in a few seashells, maybe some sparkly beads. One time we added a little plastic treasure chest from a board game, and it actually looked awesome.
✨ Step 3: Time for Glitter (aka Ocean Bubbles)
This is the moment. Add 1–2 teaspoons of fine glitter and maybe a pinch of chunky glitter for those big shimmer bursts. Think of this like making a glitter craft with depth. Too much, and it clumps. Too little, and it’s just a sad jar of floating plastic.
🧴 Step 4: Mix the Liquid
Now fill your jar about ¾ full with warm water. Then add 2–3 tablespoons of clear glue or glycerin (whichever you’ve got). Stir gently with a chopstick or butter knife. This thickens the water, so the glitter and toys move slowly—like jellyfish in a tide.
💡 Pro tip: If you’re using glycerin, stir until it’s fully dissolved. Cold water will just make it float in weird blobs.
🌊 Step 5: Add That Ocean Tint
One drop of blue food coloring. Just one. Learned that the hard way. I once squeezed in three drops and the jar looked like deep space instead of the sea. Stir gently again until the whole thing looks like liquid mermaid dreams.
🧼 Step 6: Seal the Deal
Top it off with warm water, but leave a tiny air bubble so the stuff can move around. Then seal that lid like your life depends on it—hot glue gun is your best friend here. If it’s for toddlers or travel, I even wrap electrical tape around the edge for backup.
🎀 Step 7: Decorate and Show Off
You don’t have to, but adding ribbon, washi tape, or ocean-themed stickers just makes it more fun. I’ve even written names on the lid to turn them into party favors for beach-themed birthdays.
Every time we shake these ocean sensory bottles, it’s like watching a tiny aquarium come to life. My son even named his “Captain Bubbles.” 😂 Whether you’re doing this as a weekend project or as part of a homeschool sensory activity, I promise—it’s way more satisfying than you’d expect.
Customizing Your Ocean Scene
Okay, this is where the magic really happens. If you’re like me, you’ll start with one simple DIY ocean jar and suddenly want to make a whole series—like your own little underwater gallery. 😄 The cool thing is, these jars are so customizable it’s almost addictive.
🧜♀️ Pick a Theme (Because Not All Oceans Look the Same)
I made a mermaid sensory jar for my daughter, and she lost her mind over it. We used pink and teal glitter, sparkly sequins, and even found a mini mermaid at the dollar store. For my son? Shark attack jar. Yep, red glitter and plastic sharks—definitely not calming, but he loved it.
You can go:
- Coral reef vibes with bright colors and sea turtles
- Deep sea explorer with glow-in-the-dark beads and dark blue glitter
- Beach day with tiny shells, sand-colored glitter, and pastel tones
There’s no wrong way to ocean.

💡 Mix Up the Fillers
Want to add more dimension to your underwater scene? Throw in a mix of:
- Aquarium gravel for a realistic sea floor
- Floating beads for movement
- Sequins shaped like bubbles or stars
I tried fish tank rocks once and wow—so satisfying to watch them drift slowly through the glycerin. Made the whole thing feel like a sensory craft on another level.
Side note: don’t use actual sand. It settles at the bottom and makes everything cloudy. Lesson learned.
🌟 Add a Little Glow
One of my favorite upgrades? Glow-in-the-dark beads. I charge them under a lamp before bed, and at night, it’s like having a nightlight made of sea magic. The kids love taking turns shaking it before bedtime. I call it the “sleepy sea.”
You can also use glitter with holographic flakes—it catches sunlight beautifully on a windowsill.
🖌 Personalize It
This is also a great way to turn a basic jar into a personalized calming bottle:
- Use waterproof name labels or alphabet beads
- Add a date or initials with a paint pen
- Attach a mini seashell charm to the lid with twine
We made one for Grandma with shells we collected at the beach. She legit teared up.
Every time we make one of these, it feels different. That’s what I love most about customizing your ocean scene—you can tell a story with each one. Whether it’s a tropical reef full of color or a deep blue sea with just a hint of sparkle, your jar becomes a little world of its own.
Educational Benefits and Sensory Play
Not gonna lie, when I first whipped up these calming sensory bottles, I thought they were just fun little glitter jars to keep my kids busy. But after using them for a few weeks? Whoa. These things are secretly genius.
🧠 It’s Science… Disguised as Play
We’re talking real-deal early childhood development. I noticed my daughter spent more time focusing after playing with her jar. Turns out, watching the glitter swirl actually helps with visual tracking—which is huge for reading readiness. Who knew?
Also, this whole jar thing? It’s an awesome way to explain:
- Buoyancy (why some things float and others sink)
- Water density (thanks to the glue/glycerin mix)
- Cause and effect (every shake causes a different pattern)
Honestly, I’ve turned it into a mini STEM lesson more than once. No worksheets needed—just shake, observe, repeat.
👐 Sensory Integration in Real Life
If your kiddo struggles with sensory processing, this is gold. These DIY calming jars give that visual and tactile stimulation without overwhelming them. I keep one on our homeschool shelf and another in the car. Perfect for meltdowns, transitions, or even those weird 3 p.m. cranky spells.
We’ve used them for:
- Focus time during reading
- Calming down after sibling battles (yeah, we have those too)
- Bedtime wind-down rituals
- Even during long car rides or grocery waits
Real talk: One time, my toddler was mid-meltdown in Target. I handed him his jar, and within 30 seconds, he was shaking it like a snow globe and whispering “bubbles!” Game-changer.
🎓 They’re Not Just for Little Kids
Surprise! My older kid loves them too. We did a school project on ocean currents and used the jar to show how different weights and flows interact in water. That’s hands-on learning they actually remember. Way better than a textbook diagram.
And let’s not ignore the grown-up benefits. I’ve caught myself staring at that glitter drift more than once. It’s like an anxiety fix in a jar.
So yeah, these aren’t just Pinterest-pretty. They’re practical, sneaky-educational, and totally worth making. If you’re looking for a DIY learning activity that blends calm and curiosity? You just found it.
Decorating Tips and Display Ideas
Alright, so you’ve got your ocean jar all sealed up, the glitter’s swirling like a mini whirlpool—what now? Don’t just toss it in a drawer! These DIY calming jars can actually double as adorable decor. No joke, I’ve got three lined up on a shelf, and every guest ends up asking where I bought them.
🎀 Dress It Up
Want to give your jar that extra “ooh-aah” effect? A little ribbon goes a long way. I usually wrap some twine or blue satin ribbon around the lid and tie it in a bow. Super simple, but it makes the whole thing look more polished.
- Use ocean-themed washi tape around the lid
- Stick on underwater creature stickers (we love puffy jellyfish ones)
- Paint the lid with metallic acrylics—gold looks stunning against blue glitter
- Add small shell charms with a glue dot or mini hot glue gun
Hot tip: Let the kids decorate their own jar lid. It’s one more layer of personalization and they get a huge kick out of it.
🏝 Display Like a Pro
We treat these like mini DIY home decor pieces now. No kidding. I’ve got:
- One on a floating shelf in the kids’ bathroom (yes, really—it matches the beach theme!)
- A few lined up on a bookcase with their names and dates
- One in the car’s cup holder for instant road trip calm-downs
- And a couple in a basket near our homeschool desk for mid-lesson chill breaks
You can also group them together by theme—like a “coral reef corner” or “deep sea section.” Trust me, they look Pinterest-worthy with zero effort.
🎁 Use Them as Party Favors or Gifts
We made a whole batch of these for my daughter’s under the sea birthday party, and every kid got to take one home. Big hit. Cheaper than goodie bags full of sugar and way more memorable.
You can even:
- Personalize with name tags
- Add a message like “Thanks for making waves with me!”
- Wrap the lid in cellophane and tie with jute string for a rustic vibe
I even gave one to my niece during a rough patch—she keeps it by her bed now. Something about having a piece of calm, made with love, really hits different.
So don’t just stop at functional—these sensory bottle displays can actually bring a soft, whimsical vibe to your space. Whether you’re decorating for fun or gifting from the heart, a little glitter and sea magic goes a long way.
And there you have it—your very own DIY Under the Sea Jar, shimmering with calming swirls, sea creatures, and a little bit of ocean magic. Whether you’re making it for a preschool project, a mindfulness tool, or just a rainy-day sensory activity, this craft hits all the right notes. It’s relaxing, educational, creative, and ridiculously fun to make.
Every time we make these ocean-themed calming jars, something new happens—a new color combo, a new story behind the sea creatures, even a new decorating trick. That’s what I love about it. No two jars are ever the same, just like no two waves in the sea.
If this guide helped you or brought a little sparkle into your day, I’d love for you to pin it on Pinterest and share your finished jars with friends. You never know who else might need a calming swirl of glitter right about now. 🌊✨
