

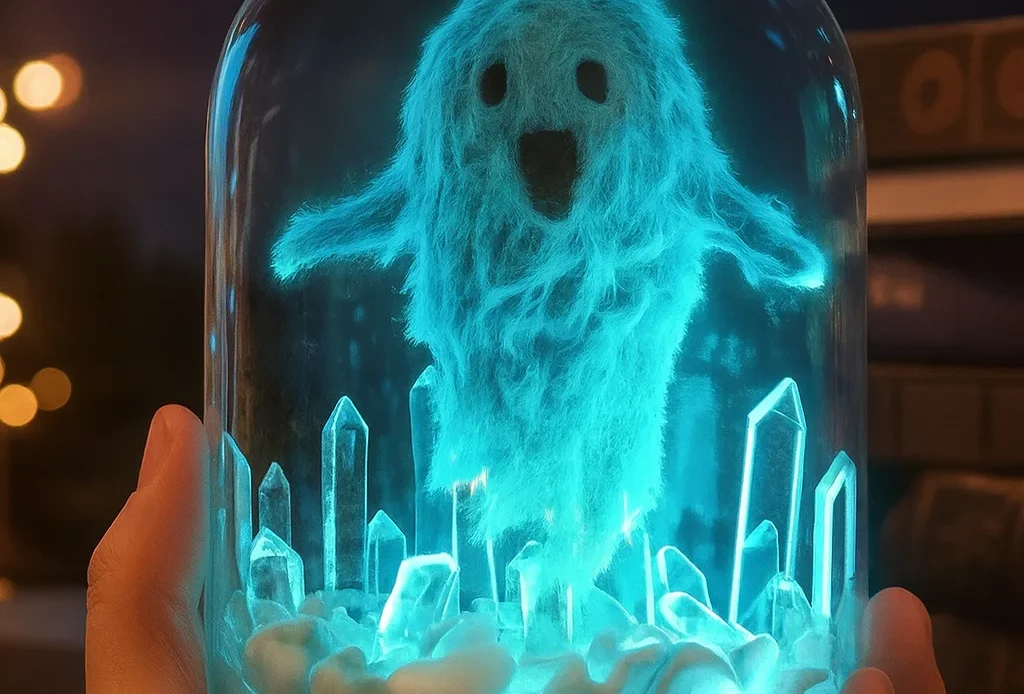
Halloween crafts don’t get much cooler—or glowier—than this! If you’re looking for something that’s spooky, fun, and slightly scientific, making your own glowing ghost jar might just be your next favorite activity. With simple household materials like cotton, baking soda, and a tea light, you’ll create a floating ghost that looks like it stepped out of a haunted snow globe.
I still remember the first time I tried this—my kids gasped when the jar lit up and the ghost “floated” eerily inside. It’s one of those crafts that feels magical and educational. Whether you’re a DIY parent, a crafty teacher, or just love Halloween, this is one creative project you don’t want to miss!
Supplies You’ll Need for Your Glowing Ghost Jar
Alright, let’s talk supplies. I used to dread pulling out a mile-long list of craft materials—especially for kids Halloween activities. But trust me, this glowing ghost jar project is super budget-friendly, and you probably already have half this stuff lying around the house.
The Basics You’ll Need:
- Clear Glass Jar (a mason jar works great!)
- Cotton Balls or batting (the fluffier the better for that ghostly look)
- Black Felt or Paper (for spooky little eyes and mouth)
- LED Tea Light or puck light (this is where the glow comes from—don’t cheap out here!)
- Faux Snow or Cotton for the base (adds that eerie “fog” effect)
- Clear Thread (to make your ghost float like it’s really haunting the jar)
- Craft Glue or hot glue (I’m impatient so hot glue is my go-to)
Now here’s where I made my first mistake—I used a dim LED light from the dollar store. Don’t do that. It barely lit up anything, and my ghost looked more sad than spooky. Invest in a bright LED light for crafts. Even those mini puck lights with remote control options make a big difference. I found a pack on Amazon that made my ghosts look like they were floating in a haunted snow globe!
Another tip: acrylic ice rocks or crystal fillers for vases add some sparkle to the base. Not required, but wow, do they take the look from “meh” to magical. My daughter insisted we add those the second time we made these, and now it’s a staple.
Oh, and about the cotton—I tried using regular stuffing once, but it clumped weird. Cotton balls pulled apart a bit give that perfect wispy ghost shape. Way more texture. I even tossed in a pinch of baking soda one time to make it look frosty. Not necessary, but it’s one of those fun little science-meets-craft touches that kids love.
For the ghost’s face, I’ve used everything from black construction paper to googly eyes. Just use what you’ve got—these aren’t supposed to be Pinterest-perfect (unless that’s your vibe). Mine looked goofy the first time, but that’s part of the fun!
Bottom line: this craft nails that balance between easy and impressive. It’s the kind of DIY Halloween craft that doesn’t stress you out—but still makes your living room look like you spent hours prepping for spooky season. And it’s such a hit with kids. I’ve even had neighbors ask if we could do a ghost jar station at their Halloween party!
How to Create the Ghost Shape
Okay, so shaping your ghost is where the magic (and the mess) really starts. I’ll be honest—my first attempt looked more like a soggy snowman than a ghost. But once I got the hang of it, it turned into one of my favorite Halloween crafts for kids.
Start with the Head
Grab a few cotton balls and gently pull them apart. Don’t rip ‘em—just stretch to fluff ‘em up. Then roll them into a soft ball, about the size of a ping-pong ball. This becomes the ghost’s spooky little head. You want it to be solid enough to hold shape, but still have that wispy, haunted look.
Now here’s where I nearly gave up the first time—getting the body right. I tried wrapping more cotton tightly around the head and it looked…horrifying (and not in the good way). The trick? Use looser, stretched cotton batting below the head to create “arms” and that flowing ghost body.
Add the Face (aka the Personality)
Cut tiny oval eyes and a circle mouth from black felt or paper. I’ve also used sticker sheets—works like a charm, especially if your scissors are dull like mine. One year, my son gave his ghost angry eyebrows. Another year? Eyelashes. Let the kids go wild—this is part of what makes these cotton ball ghosts so fun and personal.
Use a dab of craft glue or a hot glue gun (carefully!) to attach the face. Let it dry for a minute or two. And just like that, your ghost has a soul. Well, sort of.
A Sprinkle of “Frost”
Want to level up? Sprinkle a little baking soda on the ghost. I swear, it makes them look like they’ve just drifted in from the underworld… or at least from a very haunted snowstorm. Bonus: if your LED light shines from below, the baking soda glistens like frost. My niece thought we added glitter. Nope, just science.
Pro Tips from Trial and Error:
- If your ghost flops over, it’s probably too top-heavy. Make the head smaller or fluff out the bottom more.
- If the cotton sticks to your fingers like spiderwebs, dab a little lotion on your hands. Learned that one the hard way.
- Don’t stress perfection. One of our ghosts had lopsided eyes last year and my kid named him “Wonky Pete.” He’s now part of the Halloween lineup every year.
This step is where the character comes alive. Or undead, I guess? It’s creative, hands-on, and gives kids a chance to get silly with their spooky side. Honestly, it’s the part that gets the most giggles—and gluey fingers.
Setting Up the Spooky Scene Inside the Jar
This is where the real vibe kicks in. You’ve got your ghost ready to haunt, and now you need the eerie little world for it to float in. Setting up your glowing jar base isn’t just fun—it’s low-key therapeutic. Plus, it turns a basic DIY mason jar craft into something you’d legit use as a Halloween centerpiece.
Layer 1: Faux Snow or Cotton
First things first—line the bottom of your jar with cotton or faux snow. I’ve tried both, and while cotton is easier to find, that fake snow adds some serious shimmer. Just a thin layer will do; you want it to look soft and foggy, like the ghost just emerged from the underworld. (Too dramatic? Maybe. But it looks cool.)
Pro tip: stretch the cotton slightly so it doesn’t look like you just stuffed it in there like laundry. Think ghostly mist—not lint trap.
Layer 2: Baking Soda Magic
Sprinkle a small amount of baking soda over the top of the snow layer. I know, it sounds weird. But when the LED tea light hits it from below, it gives off this snowy, frosted look that’s totally haunting. I stumbled onto this by accident one year when I spilled some while baking cookies. Happy accident, 10/10 recommend.
Layer 3: Crystals, Gems, or Ice Rocks
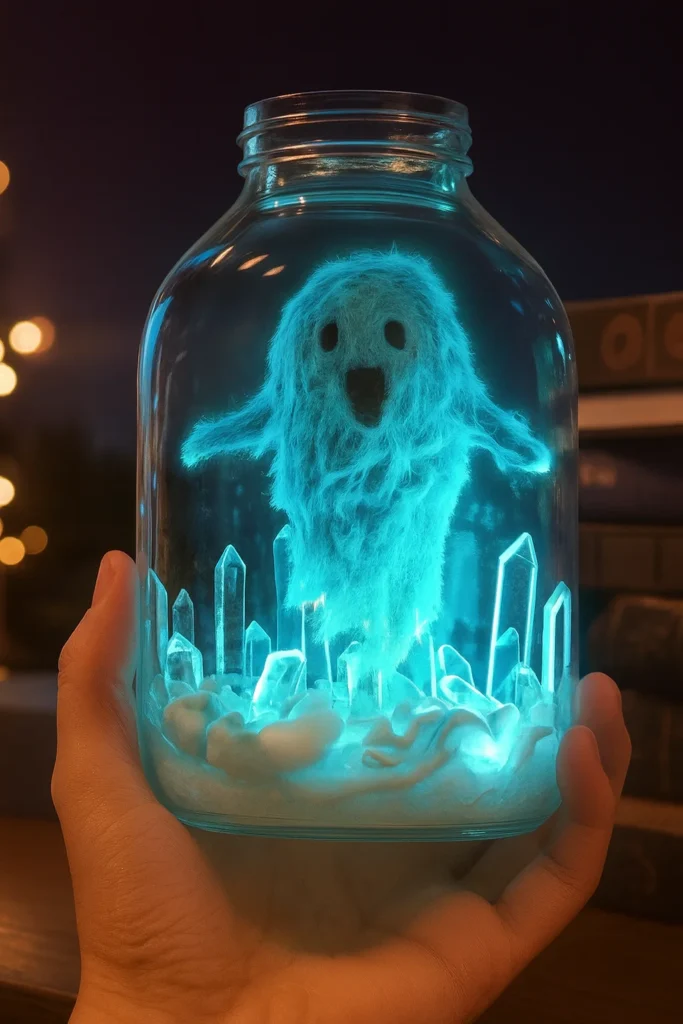
Now for the sparkle. Toss in some acrylic gems, Epsom salts, or those clear vase fillers you can get from the dollar store. These act like glowing rocks or eerie ice crystals when the light hits them. I usually let the kids pick the colors—white or light blue give the best glow though, especially with a soft white LED.
This step is optional but trust me—it takes your Halloween jar decorations from “cute” to “is that from a store?” I once had a neighbor ask if I bought mine from a boutique. I mean… I didn’t. But I felt fancy.
Layer 4: Drop in the Light
Finally, place your LED tea light in the center of the scene. If you’re using a puck light, make sure it’s secure. I once used a wobbly one that flipped over mid-party—nothing ruins spooky vibes like a ghost that falls over in front of guests.
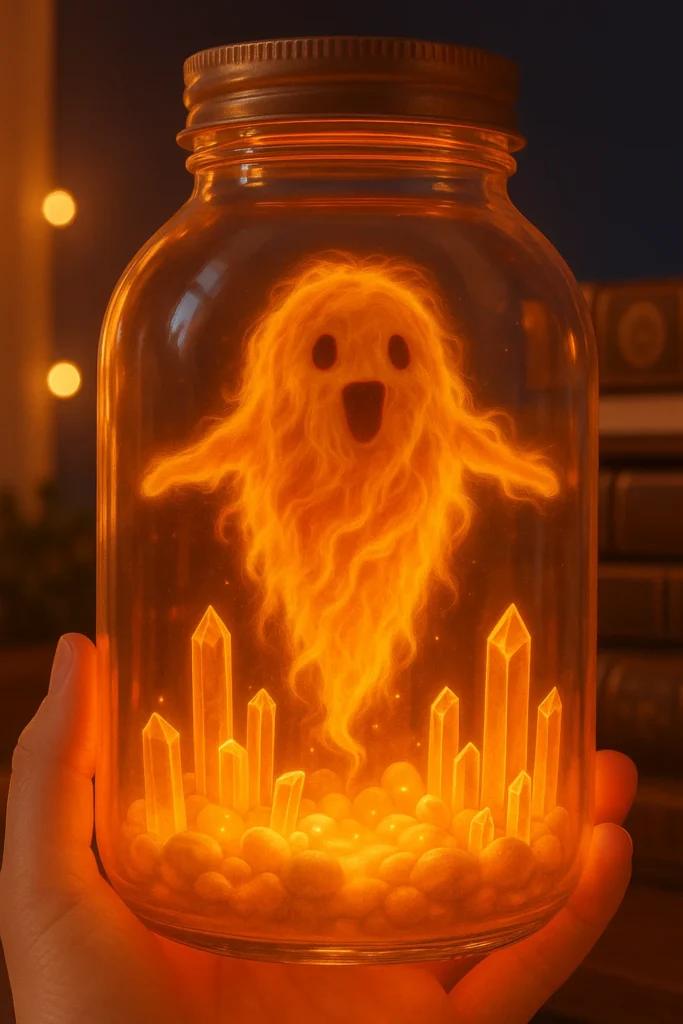
I also like using lights with a soft flicker setting. It adds this candle-like shimmer that makes the jar look alive. Or dead. You know what I mean.
You’ve now got a dreamy, ghost-ready backdrop glowing softly in your jar. Every little detail adds layers of creepiness and sparkle—like haunted meets holiday chic. It’s an easy upgrade to any Halloween décor setup, and honestly, it gets the most compliments every time.
Making Your Ghost Float
Okay, now we’re getting to the part that makes this craft really pop—literally. Floating that little ghost inside the jar is the big reveal moment, and let me tell you, when the lights are dimmed and your ghost is hovering mid-air, it feels like Halloween magic. This is the part where kids go, “WHOAAA!”
Step 1: Attach the Thread
You’ll need clear thread—the kind used for ornaments or jewelry works best. I’ve also used fishing line in a pinch, but be warned, it’s thicker and less invisible. Cut a piece about 5–6 inches long, depending on your jar height.
Here’s a lesson learned the hard way: tie the thread to the top of the ghost before placing it in the jar. I once tried tying it while holding the ghost over the jar and dropped the whole thing—face first into the faux snow. That ghost never recovered.
Step 2: Tape It to the Lid
Carefully open your jar lid, and tape the other end of the thread to the inside of the lid. Regular tape works fine if your ghost is light enough. If you went heavy on the cotton, double up with a bit of hot glue or strong adhesive dots. (Yeah, I learned that the hard way too—ghost slid right off mid-display.)
Position the ghost so it’s suspended in the middle of the jar, not touching the base. You want it to look like it’s just… hanging there. Watching you. 👻
Step 3: Close the Jar and Test the Glow
Once the ghost is hanging properly, carefully screw the lid back on. Turn on your LED light before doing this—because opening and closing a glowing jar five times with sticky hands? Nope.
Dim the room, and BOOM. Your floating ghost is now hovering in its frosty little prison. It honestly looks like something out of a Halloween movie. I’ve even had friends ask if the ghost was animated. Nope—just some clever DIY spooky decor and a clear thread hack.
Bonus Hack: Create Motion
Want to make it move a bit? Give the jar a gentle nudge and the ghost sways slightly. It’s subtle, but freaky enough to make guests do a double take. My niece called it “the haunted jelly jar” and now that name has kinda stuck.
It’s wild how something as simple as a piece of string can bring your whole Halloween jar craft to life. Or, un-life? Either way, this step adds the final spooky punch and makes your ghost feel like it’s really there. Floating. Watching. Glowing.

Why Kids Love This Craft (and Learn From It Too!)
You know what’s the best part about this glowing ghost jar? It’s not just a cool Halloween decoration—it’s an undercover learning tool. Seriously. This thing nails it as a fun DIY Halloween science project and also taps into creativity, sensory play, and storytelling. It’s got layers, like an onion. Or a haunted parfait.
It’s Hands-On Creativity
Let’s be real—kids love to make things. Give them glue, cotton balls, and glittery rocks, and they’re in heaven. This creative craft for kids lets them shape something with their hands and make it look however they want. Every ghost ends up with its own little personality. Some are spooky, some are hilarious, and some look like they’ve seen better days (mine included).
And the best part? There’s no “right” way to do it. No stress. No “you colored outside the lines.” Just full-on expression. Which is so good for their little brains.
It Teaches Basic Science Without Feeling Like School
Here’s where the Halloween STEM activity part sneaks in. You’re introducing light diffusion, layering, balance, and even a bit of physics when that ghost floats. My oldest asked why the thread was invisible and how the light made the baking soda shimmer—and boom, we were having a mini science lesson right in the kitchen.
Want to stretch the learning? Ask questions while they work:
- “Why do you think the ghost floats?”
- “What happens when we change the color of the light?”
- “How can we make it look frostier?”
Science. In disguise. And they don’t even know they’re learning.
Sensory Fun for All Ages
This craft is packed with texture—fluffy cotton, gritty baking soda, smooth gems. Kids with sensory needs especially love the contrast. I had a preschooler once sit for a solid hour just gently pulling cotton into ghost shapes and layering it into jars. That’s a win.
Even toddlers can help with parts like sticking on eyes or filling the base with snow. Just maybe keep the hot glue gun out of reach, yeah?
It Sparks Storytelling and Imagination
Once your jar is done, the ghost gets a backstory. Don’t fight it—it’s going to happen. My kids named theirs “Sir Float-a-Lot” and gave him a whole backstory about haunting an abandoned candy store. I’m not mad. That’s creativity at work.
This turns into more than just a Halloween craft for children—it becomes a memory. A silly little ghost story they’ll talk about next year when it’s time to pull out the decorations again.
At the end of the day, this isn’t just about making something cute (though it is super cute). It’s about giving kids a creative outlet, a sensory activity, and a sneaky bit of learning—all wrapped up in a glowing jar. And honestly? That’s the kind of Halloween fun I’ll say yes to every single time.
And there you have it—your very own glowing ghost jar that lights up the night and brings big Halloween energy without a big budget. Whether you made yours cute or creepy, floating or frosty, it’s a DIY Halloween decoration that gets people talking (and asking how you made it).
More than just a craft, this jar is a full-on experience. It’s a hands-on project for kids, a chance to teach something cool, and a memory you’ll bring out every spooky season. I’ve made these every year with my nieces and nephews, and every time they glow, so do their faces.
If you had fun making this ghost jar, share it on Pinterest! Seriously—pin a pic, tell your friends, maybe even start a yearly ghost-jar-making tradition. It’s one of those Halloween craft ideas for kids that turns into something more.
✨ Tag it with #GlowingGhostJar and spread the spooky joy! 🎃👻
